
K-WANG


Emerson AMS Suite: Machinery Health ™ Manager v5.61 Software Installation Guide
Emerson AMS Suite: Machinery Health ™ Manager v5.61 Software Installation Guide
Overview
This document is AMS Suite: Machinery Health ™ The installation guide for Manager v5.61 covers software installation types, operational requirements, installation steps, additional component installation, service configuration, and other content, aiming to guide users in completing the installation and related configuration work of the software.
Introduction Information
Customized installation media: According to the order, the software installation DVD includes independent (single user) or network installation versions, AMS Machinery Manager technology, and the number of licensed users. Adding technology or adding licensed users requires contacting an Emerson sales representative.
Ways to obtain assistance
After starting the software, select "Help" from the main menu.
The manual DVD in the software package contains a PDF format user manual.
Software registration can be done through phone, email, or website, and product support can also be obtained through the corresponding phone, email, and website.
Installation Type
Independent installation: allows the use of periodic technology and CSI Machinery Health analyzer on one computer, which is a single software with a single serial number on one computer. It can install AMS Machinery Manager, AMS Standalone Data Transfer (on another computer), AMS Machinery Manager ODBC Driver and other components.
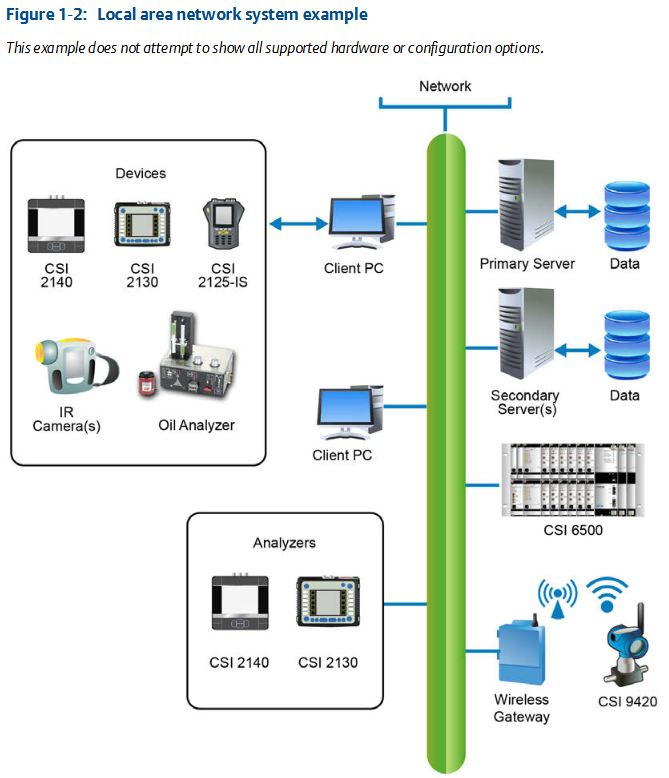
Network installation: allows the use of online and periodic technologies to communicate with CSI Machinery Health Monitor through network connections, can be deployed on local or wide area networks, and can install more components, including Online Server, Secondary Database Server, etc. Network installation is divided into single user network, multi-user network, and multi-user wide area network forms.
Operation requirements
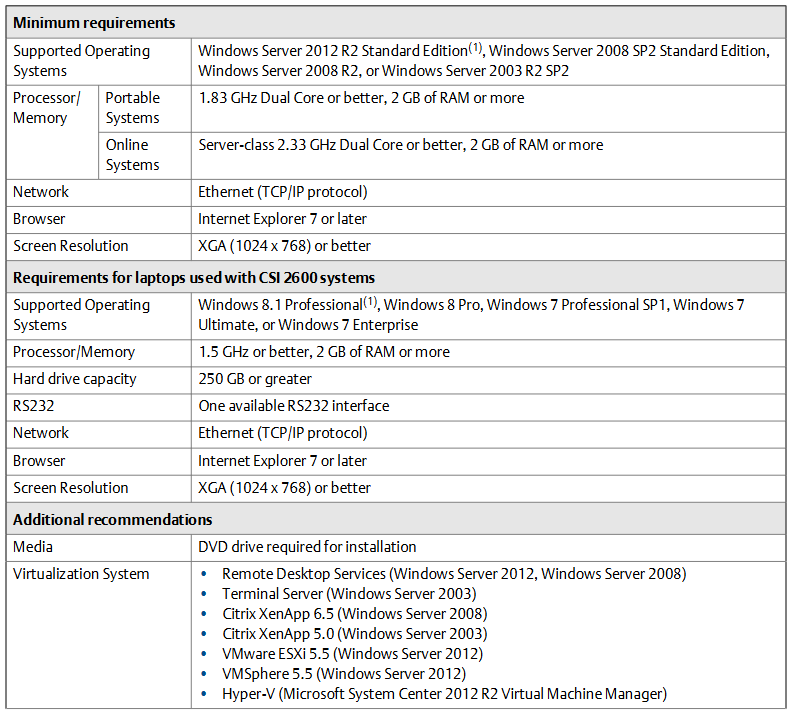
Server: lists the minimum requirements for supported operating systems, processors/memory, networks, browsers, screen resolutions, as well as special requirements for laptops used with the CSI 2600 system, and recommendations for virtualization systems and antivirus software.
Workstation: including minimum requirements and additional recommendations for supported operating systems, processors/memory, networks, browsers, screen resolution, communication requirements (RS232, USB), as well as antivirus software recommendations.
Localization precautions: The software can be authorized in English or localized versions. When installing, it is important to ensure the validity of the computer name. Different versions of Windows systems have different language and regional requirements for installing localized software.
Independent installation
Installing AMS Machinery Manager: It is necessary to first confirm that the client computer meets the workstation operation requirements, and backup the database before upgrading the software. The installation steps include logging in as an administrator, running the installation program, and installing necessary components NET Framework、 Accept the license agreement, confirm installation prompts, verify system requirements, select installation features and location, start installation, handle firewall prompts, register software, and complete installation and restart (if necessary).
Start AMS Machinery Manager: Find the program from the Start menu and select it. When logging in, the default administrator user has no password, but other users can also log in. You can also set the administrator password and create a new user in Help.
Update or repair installation: Close all related programs and services, insert the installation DVD and run the installation program, select "Add/Update" or "Repair", choose the installation function, replace files in the data directory (if necessary), start the installation and complete the subsequent steps, and restart the computer if necessary.
Network installation
Network installation overview: Before installing Machine History Viewer or CSI Data Provider, Internet Information Services must be installed first, and the database must be backed up before upgrading the software. The installation steps are to first install the network server on the server, then install the client on the workstation, and then install the secondary server and client on other computers on the network. You also need to configure the service account and firewall settings, and further configure each CSI Machinery Health Monitor.
Install network server: Confirm that the computer meets the system requirements, backup the database before upgrading, create a shared folder in advance when installing to a non-C drive, and install necessary IIS components first. The installation steps include administrator login, running the installation program, accepting the license agreement, and installation NET Framework、 Confirm installation prompts, verify system requirements, select installation features and location, start installation, handle firewall prompts, register software, and complete installation and restart (if necessary). After installation, a shared folder will be created.
Installing AMS Machinery Manager client: First, install the network server and confirm that the client computer meets the requirements and the workgroup or domain settings match. The installation steps include administrator login, browsing to the shared folder of the network server, running the installation program, selecting installation features and shortcuts, starting installation and completing subsequent steps, and restarting the computer if necessary.
Launch AMS Machinery Manager client: Find the program from the Start menu and select it. Login is similar to a standalone installation.
Installing a secondary database server: You need to first install a network server and ensure that the workgroup or domain settings match. The installation steps include administrator login, browsing to the shared folder, running the installation program, following installation instructions, accepting the license agreement, confirming installation prompts, selecting installation features and location, starting installation and completing subsequent steps, and restarting the computer if necessary. After installation, you need to create and share the CustData folder, and add a database server in network management.
Installing an online server: CSI Machinery Health Monitor is usually pre configured, and when installing additional online servers, a database server must also be selected. The installation steps include administrator login, browsing to the shared folder, running the installation program, following instructions, selecting online server and database server on the installation options page, etc. After installation, it is necessary to verify that the relevant services have been started, create and share the CustData folder, and set up the online server in network management.
Install data import server and client: Only available in network systems authorized for data import functionality, can be installed together or separately on network servers or other computers. Install the required updates or new features on the existing network server and select the corresponding components; To install on a secondary server or workstation, it is necessary to confirm that the system requirements and domain settings match, run the installation program according to the steps, and select components for installation.
Installing collaboration tools: After installation on both the network server and client, users who log in using the same network server can communicate and share information with each other. When installing on a network server, the corresponding services will be installed. To install on the client, the network server and client need to be installed first. The installation steps include administrator login, browsing to the corresponding directory in the shared folder, running the installation program, and completing the subsequent steps. When starting, select from the client's main menu.
Updating or installing new features on a network server: All related programs and services need to be closed, logged in to the network server as an administrator, ran the installation program, selected "Add/Update", selected the installation feature, started the installation and completed the subsequent steps, restarted the computer if necessary, and registered when updating software.
Additional installation
Installing Machine History Viewer: Used in conjunction with AMS Suite software, it is a browser based application. Before installation, it is necessary to install Internet Information Services (IIS) with specific features. Installing multiple components on a network server can be done in compact, recommended, or distributed configurations. The installation steps include browsing to the installation directory, running the installation program, accepting the license agreement, selecting the installation components, and installing necessary ones NET Framework、 Select the SQL Server installation location, set the SQL password, configure the installation location and network server name, etc. After completion, you can start it through the recorded URL. Before starting, you need to confirm client requirements, enable browser cookies, create users, and authorize database access.
Install AMS Standalone Data Transfer: Used to transfer routing files between the analyzer and folders on the computer or network, and cannot be installed on computers with AMS Machinery Manager already installed. The installation steps include browsing to the installation directory, running the installation program, accepting the license agreement, following the installation instructions, installing the CSI USB driver, and completing the installation.
Install AMS Machinery Manager ODBC Driver: Optional installation for accessing information from third-party software. The installation steps include browsing to the installation directory on the computer where the driver is to be installed (with the client already installed), running the installation program, accepting the license agreement, selecting the installation location, starting the installation and completing the subsequent steps, and restarting the computer if necessary.
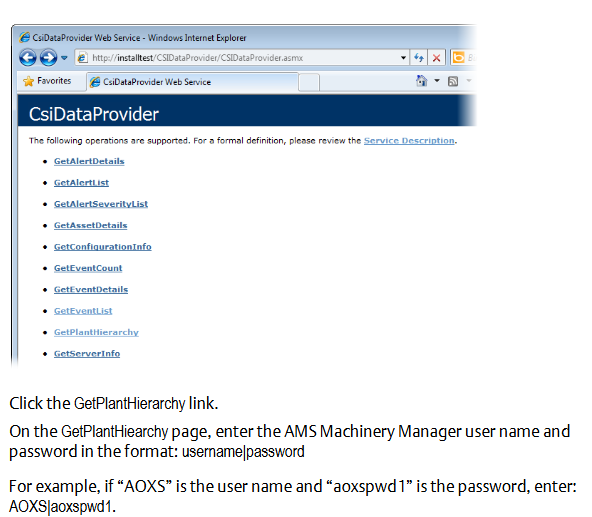
Install AMS Machinery Manager CSI Data Provider: To work with network servers to provide information for other applications, a specific version of AMS Machinery Manager support is required. Before installation, it is necessary to install IIS with specific features, which can be installed on a network server or other computer with network access permissions. The client must have been installed, the version must match, and more NET Framework 4.0。 The installation steps include browsing to the installation directory, running the installation program, accepting the license agreement, following the installation steps, confirming system requirements, setting the installation location and network server name, installing and starting relevant services, recording URLs, and completing the installation. You also need to create a user with guest access mode and authorize database access. When registering a user, access the URL through a browser and follow the steps. To create a data source, refer to the corresponding product documentation. You also need to configure the web server settings (start related services, install ASP. NET, enable ASP. NET execution, and add to a trusted site).
Install CSI USB driver: Automatically installed with AMS Machinery Manager or AMS Standalone Data Transfer, and can also be installed on any computer that requires connection to the relevant analyzer. The installation steps include browsing to the installation directory, running the installation program, accepting the license agreement, following the installation instructions, handling security prompts, and completing the installation.
AMS Machinery Manager Service
Main server functions and services: The main server is a computer that hosts a network server, listing the installed functions, corresponding services, descriptions, and purposes, such as standalone or network server corresponding to CsiNetAdmin service for authorization, etc.
Secondary server functions and services: After installing the network server, one or more functions can be installed on computers in the network. The installed functions, corresponding services, and purposes are listed, such as Database Server corresponding to CSIMTDBMgr Service for database read/write indexing, etc.
Client installation function: After the main server is installed, one or more functions can be installed, listing additional installed components, corresponding services, and purposes, such as Collaboration Tool without services, used to allow user communication, etc.
Configure network computer communication
Configure firewall settings: The AMS Machinery Manager program communicates with each other through communication ports, which may be blocked by the firewall by default. During installation, Windows may prompt to allow access and create exceptions, or manual configuration may be required. The names, numbers, types, services, executable files, connections, and purposes of the main server port, data import server port, database server port, collaboration tool server port, CSI data provider port, Machine History Viewer server port, server required port for hosting shared Cusdata folders, client and data import client required ports, online server port, OPC data port, FTP port, and optional troubleshooting ports are listed separately.
Service account: A service account is not required, but it may be useful when the service on the secondary server is difficult to establish a connection with the primary server. You can try updating the firewall settings first, and create a service account if it fails. To create a service account, you need to follow the instructions of the operating system to create a specific user account and add it to the administrator group after installing the software. Then, assign the account to each AMS Machinery Manager service, including creating the same account on the computer where the relevant service is installed. When assigning, update the login information in the service properties and restart the service. Afterwards, you can test the validity of the service account by starting the client or verifying the service function.
File Location (Appendix A)
The file location depends on the installation type. Independent systems use absolute paths, while network systems use network paths (UNC format). Listed are the types and locations of different types of files (such as installation directories, system files, data files, etc.) for independent installations, network single license or multi license servers, and network clients, as well as descriptions of each type of file.
Register AMS Machinery Manager
You can register during installation, or cancel registration later. Registration is also required when updating or repairing software. The prerequisites and steps for registering independent and network systems were explained separately, including running the registration program, contacting product support to obtain response codes, entering codes, and verifying registration status.
Update the firmware of CSI Machinery Health Monitor
Emerson regularly releases firmware updates, and it is recommended to update the firmware at the same time as updating the software (if there is a new version). The update steps include installing firmware on the FTP server (confirming prerequisites and running the installation program according to the steps), restarting the CSI Machinery Health Monitor (cycling power and verifying system status), and checking the firmware version in AMS Machinery Manager (logging into the client and checking whether the firmware version in the device properties matches through a specific path).
- YOKOGAWA
- Reliance
- ADVANCED
- SEW
- ProSoft
- WATLOW
- Kongsberg
- FANUC
- VSD
- DCS
- PLC
- man-machine
- Covid-19
- Energy and Gender
- Energy Access
- Renewable Integration
- Energy Subsidies
- Energy and Water
- Net zero emission
- Energy Security
- Critical Minerals
- A-B
- petroleum
- Mine scale
- Sewage treatment
- cement
- architecture
- Industrial information
- New energy
- Automobile market
- electricity
- Construction site
- HIMA
- ABB
- Rockwell
- Schneider Modicon
- Siemens
- xYCOM
- Yaskawa
- Woodward
- BOSCH Rexroth
- MOOG
- General Electric
- American NI
- Rolls-Royce
- CTI
- Honeywell
- EMERSON
- MAN
- GE
- TRICONEX
- Control Wave
- ALSTOM
- AMAT
- STUDER
- KONGSBERG
- MOTOROLA
- DANAHER MOTION
- Bentley
- Galil
- EATON
- MOLEX
- Triconex
- DEIF
- B&W
- ZYGO
- Aerotech
- DANFOSS
- KOLLMORGEN
- Beijer
- Endress+Hauser
- schneider
- Foxboro
- KB
- REXROTH
- YAMAHA
- Johnson
- Westinghouse
- WAGO
- TOSHIBA
- TEKTRONIX
- BENDER
- BMCM
- SMC
- HITACHI
- HIRSCHMANN
- XP POWER
- Baldor
- Meggitt
- SHINKAWA
- Other Brands
- UniOP
- KUKA
- IBA
-
LTI Drives CDF30.002.C0.7 Compact Servo Controller 08685963 DC 24V Industrial Module
-
LUST LTI Drives CDB32.008.W2.4.BR.PC1 Servo Drive Industrial Motion System
-
LUST LTI Drives CDB34.003.C2.4.PC1.H15 Servo Motor Driver Industrial Control Unit
-
LUST LTI Drives CDA32.004.C1.4.H08.B0 Servo Drive Mat. 3084456 Industrial Control
-
LUST LTI Drives CDE34.005.W2.2 Industrial Servo Drive Motion Control Unit
-
LUST LTI Drives CDA34.006.W3.0 Servo Drive Software V3.70-04 Industrial Controller
-
LTI Drives CDB32.004.C2.4.SH Servo Drive Compact Motion Controller
-
Woodward 9905-373 - Digital Synchronizer And Load Controller
-
WOODWARD MAGNETIC PICKUPS - Sensor
-
WOODWARD GCP-30 - Steuertafel for Industrial Regulator Genset Control Package
-
WOODWARD GOVERNOR 9907-1183 REV A - 505 ENHANCED TURBINE CONTROL
-
WOODWARD 9907-173 REV B - Module Load Sharing 120 Volt
-
WOODWARD 9907-014 - 2301A controller
-
Woodward 9905-029 - SPM-A Synchronizer Module Rev C
-
WOODWARD 8440-1799 EASYGEN-350 REV B - Genset Controller
-
WOODWARD 5466-258 REV M - SIMPLEX DISCRETE I/O MODULE
-
Woodward 8440-1884 C - Controller Easygen 2500-5
-
Woodward 8441-1153 - Monitoring Unit 250VAC
-
WOODWARD 8406-120 REV G - EGCP-2 DIGITAL CONTROL
-
Woodward 8273-584 - Atlas-ii Digital Control
-
Woodward 8272-582 - APM Motor Control 8272582
-
Woodward 9905-377 Rev. A - 2301A Load Sharing and Speed Control
-
WOODWARD 8272-517 - Pm Motor Control
-
WOODWARD 9905-797 REV.B - DIGITAL SYNCHRONIZER AND LOAD CONTROL DSLC-D
-
WOODWARD 8272-582 - APM MOTOR CONTROL
-
Woodward Seg FP2-8-24 - Emergency Power Telecommunications Module NP2
-
WOODWARD 2001-12E2U1B1S1A - Fuel Shut Off Valve Stop Solenoid Valve 2000-4505
-
Woodward 8440-1884 K - Genset Controller Easygen-2500-5
-
Woodward 9905-760 - Linknet Termination Module
-
Woodward 8404-009 - Proact Digital Plus Front Panel Rev. H
-
Woodward 8271-651 - Digital Speed Reference
-
Woodward 3077-474C - 8605895 5501-031 D Circuit Module
-
WOODWARD 5466-257 REV.-C - NETCON 5000 MODEL REMOTE TRANSCEIVER I/O MODULE
-
Woodward 8273-101 Rev: A - 2301D Digital Load Sharing and Speed Control
-
WOODWARD 8272-799 - 2301A SPEED CONTROL WITH REMOTE REFERENCE REV:C
-
Woodward 8272-517 - PM Motor Control
-
Woodward 8290-048 8290048 Rev. F - Generator Load Sensor
-
woodward 8273-1012 rev c - 2301e Load Sharing and Speed Control
-
WOODWARD 9905-797 - DIGITAL SYNCHRONIZER AND LOAD CONTROL FOR 3 PHASE GENERATORS
-
WOODWARD 8280-3014 - 723 PLUS DIGITAL CONTROL REV NEW
-
WOODWARD 8440-1884 REV G - GENSET CONTROLLER EASYGEN-2500-5/P1
-
Woodward 8272-683 K - Digital Reference
-
WOODWARD 9907-014 - SPEED CONTROL 2301A REV H
-
Woodward Type UG-8 P/N 037260 - Governor R.P.M 1075-1650 Motor KM58-20
-
WOODWARD 9905-970 - LINKNET 6 CHANNEL 100 OHM RTD Rev:J
-
Woodward 9907-1183 Rev C - Steam Turbine Digital SCREEN 505E Turbine Control
-
Woodward 8440-1614 - GCP-30 Genset Control Package, Rev: F, Type 1, E231544
-
Woodward DC11006-304-024 - ACTUOTOR DYNA ACTUATOR - BARBER-COLMAN
-
Woodward 9905-971 - LINKNET 6 CHANNEL 100 OHM RTD Rev:K
-
Woodward DYNK-10249 - Actuator Controller Kit - DYNA 2000
-
Woodward LR21035 - MFR1 MULTI FUNCTION RELAY REV F
-
Woodward 8440-1831 - EASYGEN 3200-5 P/N: REV. G Gererator Controller
-
Woodward 8272-516 - PM MOTOR CONTROL REV J
-
Woodward 8440-2080 - EASYGEN 2000 genset controller EASYGEN-2300-5/P1
-
Woodward 505DE - Digital Control System
-
Woodward 701 - Digital Speed Control 18-40 VDC 4-20 MA
-
Woodward 8440-1799 - EASYGEN-350 REV B
-
Woodward 8272-582 - Apm Motor Control 100-220v AC/DC
-
Woodward 5501-031 D - 3077-474C 8605895 Circuit Module
-
Woodward XD1-T - XD1T55SAT TRANSFORMER DIFFERENTIAL PROTECTION RELAY
-
Woodward 8272-517 - PM Motor Control 220vac
-
Woodward 8934-658 - Repair Kit UG8D Governor
-
Woodward 5437 18 - module netcon derivative analog rev.A
-
Woodward 8272-171 A - Pm Motor Control
-
Woodward MRN3-1/2 - SEG mains uncoupling relay MRN314D mains decoupling relay
-
Woodward 9905-373 - Digital Synchronizer and Load Control 18-40 VDC Rev P
-
Woodward 5431-640 C - Dual Dynamics 1000 Series Speed Control Module
-
Woodward 5501-031 D - 3077-474C 8605895 Circuit Module
-
Woodward 9907-247 - 828 DIGITAL CONTROL
-
Woodward 8440-1855-G - EASYGEN-2200-5 /P1 12/24VDC GENSET CONTROLLER
-
Woodward NC3-2-8 (NO) - GENERATOR CONTROLLER
-
Woodward 8271-467 K - 2301 LOAD SHARING AND SPEED CONTROL PART NO:
-
Woodward 8440-2177 A - SPM-D2-10 Digital Synchronising Controller
-
Woodward LXMG1614E-14-11 - CCFL and UV Lamps Inverter Module
-
Woodward 8270-990 - signal converter
-
Woodward 9905-068 - LOW VOLTAGE 2301A LOAD SHARING & SPEED CONTOL P/N:
-
Woodward 8901-051 - BOOSTER SERVOMOTOR, SINGLE CYLINDER, 2:1
-
Woodward 8444-1024 D - MWS4-55M CONTROL MODULE UNIT
-
Woodward 5448-914 - GCP-20 Genset Control GCP-20 REV D P/n:
-
Danfoss BHA-1 018-1942 - Hydraulic Actuator
-
Woodward 9905-001 L - SPM-A SYNCHRONIZER
-
Woodward 5464-850 - Module
-
Woodward 5501-371 - Micronet Simplex Mpu Aio Rev C
-
Woodward 8272-132 B - POWER SENSOR
-
Woodward 9907-028 - SPM-A Synchronizer
-
Woodward SA-3678-AM-2 - Overspeed Electric Governor, Model ESSE2-AM
-
Woodward E8250-502 - GOVERNOR ACTUATOR
-
Woodward 8440-1884 J - Controller EASYGEN-2500-5
-
Woodward 5441-693 - DIGITAL I/O MODULE -MISSING PART
-
Woodward SA-4450 - Speed Controller APECS 3100 For Magnetic Pickup
-
Woodward 9903-466 - 701 DIGITAL SPEED CONTROL REV G
-
Woodward 1765-843 - Governor Speed Adjusting Motor P/N Type: SMM40 220V AC 50/60Hz
-
Woodward 9905-760 - Linknet Termination Module
-
Woodward 9907-247 - 828 DIGITAL CONTROL UNIT REV K
-
Woodward 5484-721 - motor
-
Woodward 8440-1734 - MFR-2 Rev.A Multi Function Relay MFR-2
-
Woodward CSC3SUWA - Controller
-
Woodward 8440-1667 - REV B SPM-D1010B/XN
-
Woodward 8406-120 - egcp-2 digital control
-
Woodward DPG-2201-002 - DIGITAL CONTROLLER REV D
-
Woodward 8272-516 - Pm Engine Control Rev J
-
Woodward 8440-1831 - EASYGEN 3200-5 P/N: REV. K - WITHOUT ACCESSORIES
-
Woodward 8273-101 - LOAD SHARING & SPEED CONTROL
-
Woodward 8440-1855-G - EASYGEN-2200-5 /P1 12/24VDC GENSET CONTROLLER
-
Woodward 9907-247 - 828 DIGITAL CONTROL UNIT REV K
-
Woodward LR21035 - MFR1 MULTI FUNCTION RELAY REV J
-
Woodward 8404-009 - PROACT DIGITAL PLUS FRONT PANEL REV J
-
Woodward 9905-204 - Rev N SPM-A synchronizer
-
Woodward 8521-367 - UG-8 P/N r R.P.M 750-1280 Governor / UG8
-
Woodward 9907-175 - Load Sharing Module Rev. B
-
Woodward 5464-645 - DRIVER MODULE REV A 2C ACT DRIVE
-
Woodward 8404-009 - PROACT DIGITAL PLUS FRONT PANEL REV J
-
Woodward 9907-175 - Load Sharing Module Rev. B
-
Woodward 8406-102 - Rev A EGCP-2 Digital Control Engine Generator 8406102
-
Woodward EASYGEN-2500-5 - Controller Genset
-
Woodward 8440-2082 - Controller
-
Woodward 8272-516 - PM MOTOR CONTROL REV J
-
Woodward 9905-373 - Digital Synchronizer and Load Control 18-40 VDC Rev P
-
Woodward 5501-429 - Actuator Controller 25mA 2 Channel , (UPP)
-
Woodward 8440-1869 - SPM-D10 Synchronizing System Control-SPM-D10B/PSY4-F-D
-
Woodward 9907-175 - Load Sharing Module Rev. A
-
Woodward 8200-224 - Servo Position Controller
-
Woodward 9906-619 - 723 PLUS DIGITAL CONTROL ( 8280-604 )
-
Woodward 8440-1519 - EASYGEN PART NO: REV: 4
-
Woodward 5501-371 - REV C MODULE- MICRONET SIMPLEX MPU & AIO FTM
-
Woodward EASYGEN-3200-5/P1 - Generator Controller Module Rev F
-
Woodward 8440-1884K - GENERATOR CONTROLLER EASYGEN-2500-5 REV,K
-
Woodward 5466-353 - REV C NETCON MAIN CHASSIS TRANSCEIVER

K-JIANG

Add: Jimei North Road, Jimei District, Xiamen, Fujian, China
Tell:+86-15305925923