

K-WANG


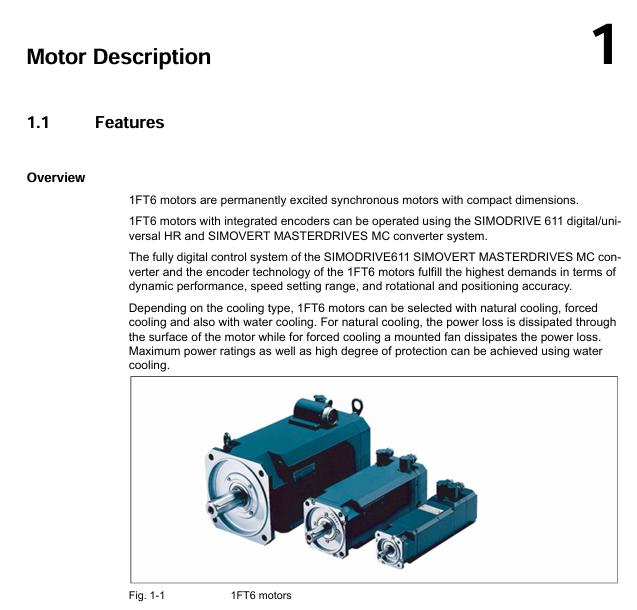
SIEMIENS PFT6 series weighing sensor
SIEMIENS PFT6 series weighing sensor
Product core positioning
The PFT6 series is a strain gauge weighing sensor designed for harsh industrial environments. Its core advantages are high precision, high protection, and strong anti-interference ability. It is suitable for scenarios with strict requirements for weighing accuracy, such as batching systems and trade settlement belt scales. The range covers 10kg-5000kg and can meet the needs of industrial weighing from light to medium.
Product principle and core features
1. Measurement principle
Based on the effect of resistance strain gauges, the core structure consists of a metal elastomer and resistance strain gauges attached to the elastomer
When the sensor is subjected to a load, the metal elastomer undergoes slight deformation;
Strain gauges undergo resistance changes with the deformation of the elastic body (stretching → increasing resistance, compression → decreasing resistance);
Convert the resistance change into a voltage signal (rated output 2mV/V) through a Wheatstone bridge, and transmit it to the weighing instrument for data processing.
2. Core Features
High precision level: C3 level in accordance with OIML R60 standard (suitable for medium to high precision weighing, division value ≤ 3000), ensuring the accuracy of trade settlement and industrial batching;
High protection performance: The conventional model has a protection level of IP67 (dustproof, anti short-term immersion), and the special customized model can reach IP68 (no damage after soaking in 1m underwater for 24 hours), suitable for harsh industrial environments such as dust and humidity;
Wide temperature adaptability: Temperature compensation range of * * -10 ℃~+40 ℃ (ensuring stable accuracy within this range), working temperature range of -30 ℃~+60 ℃ * *, suitable for high and low temperature industrial scenarios;
Anti interference capability: The single ended grounding design of the cable shielding layer reduces electromagnetic interference (EMC) and is suitable for industrial strong electromagnetic environments;
Overload protection: Safe overload capacity of 150% rated load (R.C.), ultimate overload capacity of 300% R.C., to avoid permanent damage caused by accidental overload.
Key technical parameters
1. Range and accuracy parameters
Range (R.C.) Accuracy level Nonlinear (≤±% R.O.) Lag (≤±% R.O.) Repeatability (≤±% R.O.) Sensitivity Temperature drift (≤±% R.O./℃)
10kg-50kg OIML C3 0.02 0.02 0.01 0.0005
100kg-200kg OIML C3 0.02 0.02 0.01 0.0005
500kg-1000kg OIML C3 0.02 0.02 0.01 0.0005
2000kg-5000kg OIML C3 0.02 0.02 0.01 0.0005
Note: R.O. (Rated Output)=Rated Output, R.C. (Rated Capacity)=Rated Load
2. Electrical parameters
Parameter Category Specific Indicator Remarks
Rated output 2mV/V ± 0.1% based on 10V DC excitation voltage
The resistance between the excitation terminals of the input resistor 380 Ω± 20 Ω
The resistance between the output resistor 350 Ω± 5 Ω signal terminals
Insulation resistance ≥ 5000M Ω (50V DC) between the measuring end and the casing
Excitation voltage 5V DC-15V DC, recommended 10V DC, maximum not exceeding 15V DC
Maximum excitation current of 10mA to avoid excessive excitation current causing strain gauge heating
3. Environmental and mechanical parameters
Parameter category specific indicator standard basis
Working temperature range -30 ℃~+60 ℃ IEC 60068-2-1/2
Temperature compensation range -10 ℃~+40 ℃ OIML R60
Humidity adaptation ≤ 95% RH (non condensing) IEC 60068-2-3
Protection level IP67 (conventional), IP68 (customized) IEC 60529
Allowable lateral force ≤ 10% R.C. Siemens design specifications
Allowable torque ≤ 10% R.C. Siemens design specifications
Vibration tolerance 50Hz, 10m/s ² (10-2000Hz) IEC 60068-2-6
Impact withstand 100m/s ² (11ms) IEC 60068-2-27
Installation and connection specifications
1. Preparation before installation
Environmental inspection: Confirm that the installation environment temperature and humidity meet the parameter requirements, there are no corrosive gases or strong magnetic fields (if additional protection is required);
Load confirmation: Ensure that the actual weighing load is within the range of the sensor (avoid long-term close to 150% R.C. safe overload);
Tool preparation: Suitable torque wrench (ensure thread fixing torque compliance), level (calibrate installation plane), cleaning tool (clean installation surface impurities).
2. Mechanical installation requirements
Installation plane: The support surface should be flat (flatness error ≤ 0.1mm/m), sturdy, and avoid affecting measurement accuracy due to deformation of the support surface;
Alignment requirements:
When installed vertically, the load should be applied along the axis direction of the sensor, and tilting is prohibited (deviation ≤ 0.5 °);
When installing horizontally (such as a belt scale), the sensor needs to be accurately aligned with the weighing frame to avoid lateral forces;
Load limit: Strictly control lateral force and torque to ≤ 10% R.C., and install guiding devices (such as locating pins) if necessary;
Fixed specifications:
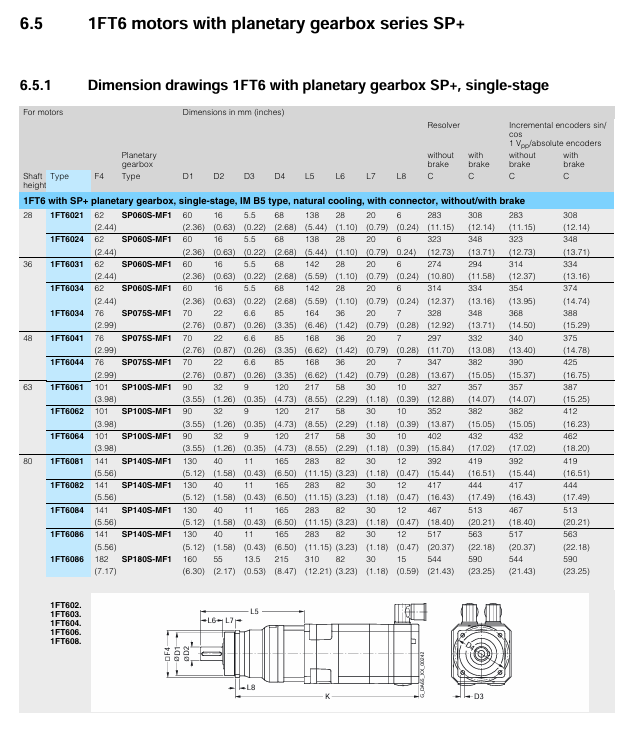
Range (R.C.) Fixed thread specification Recommended torque (Nm) Prohibited behavior
Excessive tightening of M6 8 from 10kg to 50kg (to avoid deformation of the elastic body)
100kg-200kg M8 12, use a hammer to strike the sensor (damaged strain gauge)
500kg-1000kg M12 18 sensor in direct rigid contact with load (without buffering)
2000kg-5000kg M16 20 adjust the load direction after installation (generate lateral force)
3. Electrical connection specifications
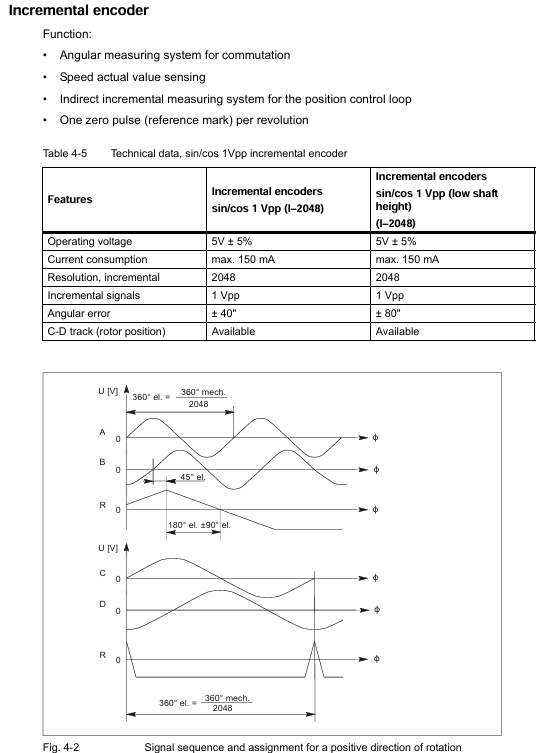
Wiring method: Adopting a 4-wire system (red: excitation+, black: excitation -, green: signal+, white: signal -), some models support a 6-wire system (including compensation lines to improve long-distance transmission accuracy);
Cable requirements:
Use shielded cables (recommended cross-sectional area 0.25mm ² -0.5mm ²), with a cable length of ≤ 30m (if exceeding, a 6-wire system or signal amplifier is required);
Single end grounding of cable shielding layer (only grounded at the weighing instrument end to avoid the formation of grounding circulation);
Joint protection: IP67 waterproof joint is used, and the sealing nut needs to be tightened tightly after connection to prevent liquid infiltration;
Insulation requirement: Before wiring, a multimeter should be used to check the insulation resistance of the sensor (≥ 5000M Ω) to avoid signal interference caused by poor insulation.
Calibration and maintenance process
1. Calibration specifications
Calibration standard: Must comply with OIML R60 C3 level requirements, with calibration equipment accuracy ≥ 1/3 C3 level (such as standard weights, SIWAREX calibration tools);
Calibration conditions:
After the installation of the sensor is completed, let it stand for 24 hours (to ensure the release of elastic stress);
The ambient temperature remains stable at * * -10 ℃~+40 ℃ * * (within the temperature compensation range);
No vibration or airflow interference;
Calibration steps:
No load calibration: Ensure that the sensor is unloaded, perform "zero calibration" through the weighing instrument, and clear zero drift;
Loading calibration: Load standard weights in the order of 25% R.C., 50% R.C., 75% R.C., and 100% R.C., and record the instrument display value;
Error correction: If the displayed value deviates from the standard weight by more than ± 0.02% R.O., adjust the sensitivity through instrument parameters and repeat loading until the error is compliant;
Calibration records: Save calibration data (date, equipment, personnel, error values), and calibration certificates must comply with NIST traceability requirements.
2. Daily maintenance
Cleaning requirements: Clean the sensor surface every 3 months (using a dry soft cloth and avoiding the use of corrosive cleaning agents) to prevent dust and liquid accumulation from affecting the protective performance;
Status check:
Monthly inspection of mechanical connections (whether threads are loose and joints are sealed);
Check electrical connections (insulation resistance, cable shielding layer grounding) every 6 months;
Calibration cycle: Under normal usage scenarios, calibration should be conducted every 12 months. If used for trade settlement or harsh environments (such as vibration and high temperature), it should be shortened to 6 months;
Fault handling: When weighing data drift and accuracy decrease are found, priority should be given to checking the installation status (whether there is lateral force or deformation of the support surface), and then recalibration should be carried out. If there are still abnormalities, Siemens maintenance should be contacted.
Safety and Compliance
1. Safety regulations
Overloading is prohibited (long-term load ≤ 100% R.C., short-term impact ≤ 150% R.C.);
Sensors are precision equipment and should not be disassembled, knocked or welded, as this may cause permanent damage;
Explosion proof scenarios require the use of ATEX certified models, and conventional models are prohibited from being used in explosion-proof areas (such as chemical workshops).
2. Compliance certification
Compliant with EN 61298-2 (Safety Requirements for Industrial Weighing Equipment) and IEC 61298-2 (International Standard);
Having CE certification (EU market access) and optional ATEX certification (for use in explosion-proof areas);
The weighing accuracy meets OIML R60 C3 level and can be used in trade settlement scenarios (with compliance instruments required).
Application scenarios and adaptive instruments
1. Typical application scenarios
Application type, specific scenario, recommended range, protection level requirements
Belt scale weighing industrial belt conveyor (such as coal and ore transportation) 500kg-5000kg IP67
Weighing of chemical raw material tanks and food ingredient hoppers 100kg-5000kg IP67/IP68 (wet)
Automatic packaging machine for packaging equipment (such as flour and feed packaging) 10kg-200kg IP67
Industrial batching system multi-component mixed batching (such as concrete, paint) 50kg-1000kg IP67
2. Adapt to Siemens instruments
SIWAREX M: Modular weighing instrument, compatible with single/multi-sensor systems, supports PROFIBUS communication;
SIWAREX FTC: Compact instrument suitable for weighing belt scales and material tanks, with automatic calibration function;
SIWAREX U: Universal instrument, supporting 4-20mA analog output, suitable for small and medium-sized weighing systems.
- YOKOGAWA
- Reliance
- ADVANCED
- SEW
- ProSoft
- WATLOW
- Kongsberg
- FANUC
- VSD
- DCS
- PLC
- man-machine
- Covid-19
- Energy and Gender
- Energy Access
- Renewable Integration
- Energy Subsidies
- Energy and Water
- Net zero emission
- Energy Security
- Critical Minerals
- A-B
- petroleum
- Mine scale
- Sewage treatment
- cement
- architecture
- Industrial information
- New energy
- Automobile market
- electricity
- Construction site
- HIMA
- ABB
- Rockwell
- Schneider Modicon
- Siemens
- xYCOM
- Yaskawa
- Woodward
- BOSCH Rexroth
- MOOG
- General Electric
- American NI
- Rolls-Royce
- CTI
- Honeywell
- EMERSON
- MAN
- GE
- TRICONEX
- Control Wave
- ALSTOM
- AMAT
- STUDER
- KONGSBERG
- MOTOROLA
- DANAHER MOTION
- Bentley
- Galil
- EATON
- MOLEX
- Triconex
- DEIF
- B&W
- ZYGO
- Aerotech
- DANFOSS
- KOLLMORGEN
- Beijer
- Endress+Hauser
- schneider
- Foxboro
- KB
- REXROTH
- YAMAHA
- Johnson
- Westinghouse
- WAGO
- TOSHIBA
- TEKTRONIX
- BENDER
- BMCM
- SMC
- HITACHI
- HIRSCHMANN
- XP POWER
- Baldor
- Meggitt
- SHINKAWA
- Other Brands
- other brands
- UniOP
- KUKA
- IBA
-
Metso XZB10025-011T12 - Moog Valve 9650962700
-
Metso XZB10025-010T12 - Moog Valve 9650965300
-
Metso-SP Transmitter Cable - Operating Unit with 10m Cable
-
Harkila Metso Hybrid - Hunting Jacket Willow Green
-
Metso ND8221/S1 - Neles Valve Positioner
-
Metso METSO10119 - ScreenCheck Component
-
Metso LK-2025 - Linkage Kit
-
Metso A416733 - IQweight External Air Gap Temperature Sensor
-
Metso RKC22MT - Automation Component
-
Metso A413281 - Automation Board
-
Metso LCP9HLY - Stainless Steel Enclosure
-
Metso NP704S/B1S1 - Pneumatic Positioner with I/P Converter
-
Metso BAH3 - Slurry Seal Type
-
Metso A413531-03 - PLC Module Chassis Rack
-
Metso P4610004 - MCAI Communicator Controller
-
Metso QN2AN03HDM - Quartz Valve Positioner Stonel
-
Metso RKW-352-XZ - Automation Component
-
Metso A4300081 - Kajaani LCD Display
-
Metso A428026 7B - Kajaani Rectifier Unit 1
-
Metso 202218 - Kajaani Sensor Power Supply SR 902660
-
Metso 9150 316SS CSTL - Jamesbury 150-2" BN50 Valve
-
Metso 81806 - IOP101 Module
-
Metso STOM000272 - Paper Bushing CR38
-
Metso 1975413 - Chain Hoist Links
-
Metso IMO G053-191597 - Minor Seal Kit
-
Metso VAL0087418 - Cylinder Valmet NTS6LV
-
Metso A413061 - DMU Board VPA 420355-4B
-
Metso P2620-80/25-100 - Automation Component
-
Metso VAL0035292 - Automation Component
-
Metso A413721 - Automation Component
-
Metso ST600 - Automation Component
-
Metso P4500001 - Automation Component
-
Metso SDBX/RA2 - CAT x KVM Extender
-
Metso D201126-DI8 - Digital Input Module
-
Metso D201189L - AI8H Analog Module
-
Metso NA004418 LK1016 - Wafersphere Actuator Mounting Bracket
-
Metso RKN172MTT - Repair Kit
-
Metso MM0311584 - Air Filter Kit RadialSeal
-
Metso 181517 - IOP301 Isolated Analog Input Module
-
Metso RAU3906506 - Automation Component
-
Metso 181208 - IOP332 Digital Input Module
-
Metso A413760 - AIF2C PCB Module
-
Metso 006 1089 36 - Shaft Bearing Seal
-
Metso A413046 - Automation Component
-
Metso VKJ650 - Automation Brake Component
-
Metso LK-1875 - Linkage Kit
-
Metso D201193L - FI4S24 Frequency Input Module
-
Metso D200533 - BIU82 Binary Input Module
-
Metso 500838-M1 - Impeller Pump Release Collar Assembly
-
Metso 2.00SB2ALUS19A - Pneumatic Cylinder 1.375 Stroke
-
Metso D201351 - RES Reserve Module
-
Metso A416100 - IQMoisture Spare Part Kit Halogen Lamp
-
Metso Slurry Pump - Back Liner
-
Metso 7088010042 - Bronze Lantern Ring
-
Metso IMC-101-M-SC - Industrial Media Converter
-
Voith S1-S1-CAM-ENCL - Metso Pump Cmare Housing & Bracket
-
Metso A4430726V1.1 - Kajaani Connection Box CI 4-9-10
-
Metso A413016 - NCU2 PLC Board
-
Metso D202213P - MBMT80 Base
-
Metso A413135 - AOU-4 Analog Output Board
-
Metso NP 724A - Pneumatic Valve Positioner
-
Metso A413246 - Automation Controller Module
-
Konaflex VKJ-650 - Disc Brake Set Pair
-
Metso WIN3096535D - Core Chuck
-
Metso D201380 - MBR Base with IBC & IPS
-
Metso D202213L - MBMT80 Base Module
-
Metso 181571 - IOP337 PLC Module
-
Metso MF0588336 - Main Hydraulic Filter
-
Metso 181504 - IOP303 RTD Input Module
-
Metso A413240 - PIC2 Board
-
Denver 566534PS - Case Liner Gland Side SRL Frame 2
-
Metso 181508 - IOP322 Digital Input Module 120V
-
Metso 181520 - IOP351 Relay Output Module Form A/B
-
Metso 181220 - IOP351 Relay Output Module
-
Metso A413150 - BOU 8 Binary Output Module
-
Metso 128400-M1 - Impeller
-
Metso D201379 - MBB Base with IBC & IPS
-
Metso 205181 - T/B MTD PRWSW Assembly
-
Metso QPX1C/K15 - Jamesbury Quadra-Powr X Actuator Valve
-
Harkila Metso Winter - Hunting Jacket Willow Green
-
Metso NE724A/A-L - Electro-Pneumatic Positioner
-
Metso PACP-100-80-31 916 - Automation Component
-
Metso 81814 - Automation Component
-
Metso ER-12-01-M-CT - Automation Board
-
Metso ELO24 - Automation Board
-
Metso A413000 - Valmet Neles CPU PLC Board
-
Metso XL-2213-0525 - Mainframe Bushing
-
Metso D100097 - ECR Extension Module
-
Metso 804511 - Filter Housing Assembly
-
Metso S420154 - Automation Rack Chassis
-
TRICONEX 2211 Baseplate for 3211 I/O Module Triconex System Component
-
TRICONEX CM3201 Communication Module Industrial Control System
-
ABB 560CMR01 Communication Module RTU560 Control Unit
-
Metso 1NWH155 - Ethernet Hub
-
Metso T22PO 103913968 - Sampler Valve (LF02C)
-
Metso EDS-516A-MM-SC - Ethernet Device Switch
-
Metso MC4-16-4 - Brass Rotary Oscillator Drive
-
Metso XT03CWTAS6SJHA - 3" Ball Valve Assembly
-
Metso 181226 - Digital Input Module
-
Metso RAU4E62037 - Valmet Posieve Plus Measuring Head
-
Metso VT-223779/2 - Sealing Housing SD42"B
-
Metso J2029 010 10722 - Circuit Board
-
Metso D202038-ACN-PO - Automation Component
-
Metso NE724/S1-CE01 - Electro-pneumatic Valve Positioner
-
Metso M851004 - CPU Module T194-v0
-
Metso Trucker Hat - Finland Golf Ball Cap
-
Metso DN6-50 - Jamesbury 1/4" Valve
-
Metso B1CU6/20L - Pneumatic Actuator
-
Metso B1CU6/25L - Pneumatic Actuator
-
Metso A416040-09 - Power Rating Unit 28 VDC
-
Metso A4300018B - Central Unit Communication Interface
-
Metso ND9106HN/K05 - Intelligent Valve Controller
-
Metso D200537 BOU83 - Binary Output Model 02
-
Metso A413111 TIU61 - Temperature Input Unit Board
-
Jamesbury 730S313600XTZ2 - 1" Flanged SS Ball Valve
-
Metso HG4A12SH0 - Pressure Transmitter with Coupling
-
Metso A413146 BIU 4 - Binary Input Module
-
Metso DDC7940-D201139 - Controller Module
-
Metso Square Flange - Discharge Flange for Slurry Pump
-
Metso A413177 - Automation Board
-
Metso BOU82 D200536 - Binary Output Module
-
Metso D200619 - Personality Module
-
Metso RKN50MT - Actuator Repair Kit
-
Metso IOP335 - Counter Timer Module
-
Valmet IOP341R 181560 - Positioner Module
-
Metso A413150 - Power Module
-
Metso RKN-184XTZ - Actuator Repair Kit
-
Metso Flinger Seal - Slurry Pump Component

KONG JIANG


Add: Jimei North Road, Jimei District, Xiamen, Fujian, China
Tell:+86-15305925923


