

K-WANG


Westinghouse WGen2000, WGen3600, and WGen3600V portable generators
Westinghouse WGen2000, WGen3600, and WGen3600V portable generators
Core parameters and configuration of the product
1. Basic parameters (common/difference comparison among three models)
Parameter category WGen2000 WGen3600 WGen3600V
Operating power 2000 Watts 3600 Watts 3600 Watts
Peak power 2500 Watts 4650 Watts 4650 Watts
Fuel tank capacity 15L/4.0 gallons 15L/4.0 gallons 15L/4.0 gallons
Rated speed 3600 RPM 3600 RPM 3600 RPM
Ignition type TCI (transistor ignition) TCI (transistor ignition) TCI (transistor ignition)
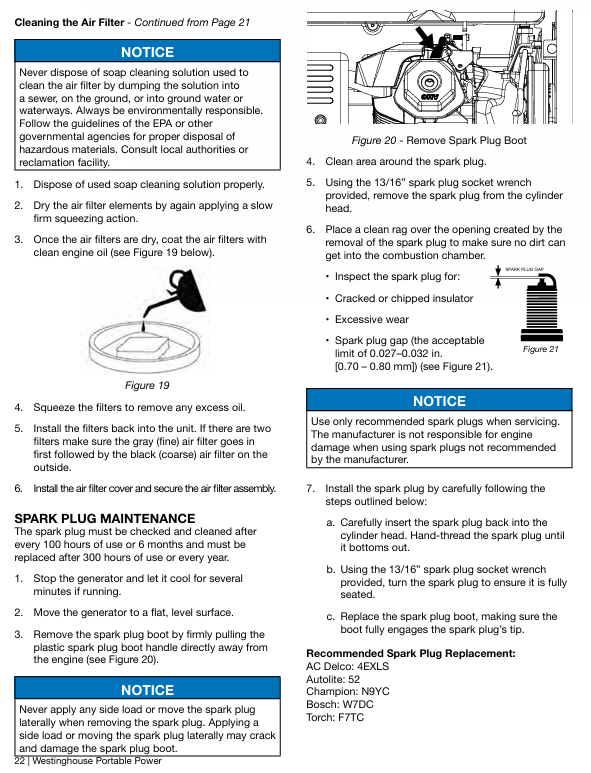
Spark plug model F7TC F7TC F7TC
Engine displacement 212 cc 212 cc 212 cc
Cylinder diameter x stroke 55 x 70 55 x 70 55 x 70 55 x 70
Oil capacity 0.60 L 0.60 L 0.60 L
Recommended engine oil 10W30 (4-stroke engine oil) 10W30 (4-stroke engine oil) 10W30 (4-stroke engine oil)
Total Harmonic Distortion (THD) < 23% < 23% < 23% < 23%
Special configuration - non inflatable wheels, integrated rubber handle-
California compliance configuration optional CARB carbon canister optional CARB carbon canister standard CARB carbon canister
2. Core components and functions
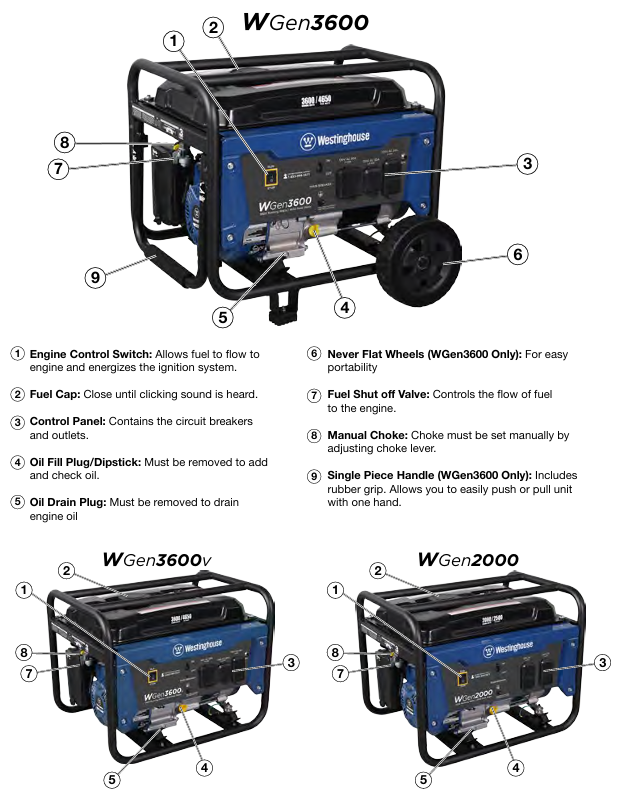
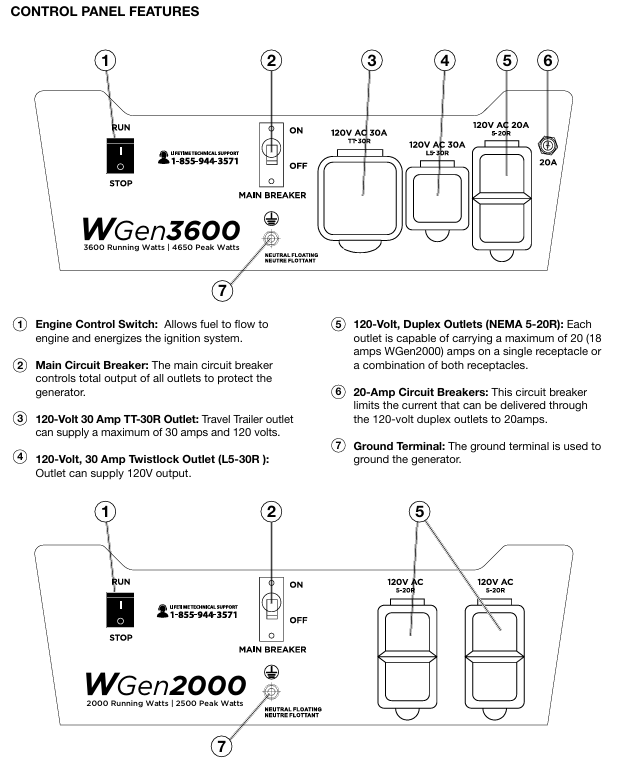
Control panel: including main circuit breaker, multiple power sockets (120V 20A dual socket, 120V 30A trailer specific socket, 120V 30A twist lock socket), grounding terminals, WGen2000 dual socket maximum load of 18A, other models are 20A.
Engine components: including fuel tank (with oil level gauge), muffler and spark arrester (fireproof flower leakage), ignition coil assembly, throttle return spring, governor linkage device, etc.
Safety components: low oil level automatic shutdown switch (cutting off the engine when there is insufficient oil), circuit breaker (overload protection), GFCI socket (some models, anti leakage).
Safety operation standards (top priority)
1. Environmental safety requirements
Only operate in outdoor ventilated areas, away from doors, windows, ventilation openings, and flammable materials. The minimum safe distance is 6 feet (1.8 meters). It is strictly prohibited to use indoors, in garages, or in enclosed spaces (engine exhaust contains carbon monoxide, colorless, odorless, and highly toxic).
It should be placed on a flat and hard surface, avoiding loose environments such as sand and grass (to prevent debris from blocking the air intake or cooling system); Do not use in rainy, snowy, humid environments or areas with accumulated water (to prevent short circuit and electric shock).
Avoid high temperature and high conductivity areas (such as metal decks, steel construction sites), and operate without open flames or sparks (such as cigarettes, matches, static power sources) around.
2. Fuel safety operation
Only use unleaded gasoline grade 87 and above, with an ethanol content not exceeding 10%. It is strictly prohibited to use 2-stroke engine oil, diesel, or other fuels.
Before refueling, the machine must be stopped and cooled to a surface that is not hot to the touch. Clean the surrounding area before opening the fuel tank cap and slowly refuel, not exceeding the neck of the refueling port (leaving space for fuel expansion).
If there is a fuel leak, immediately wipe it clean with a cloth and dispose of the cloth properly. Wait for the leaking area to dry before starting the generator; Wear goggles when refueling to avoid prolonged skin contact with fuel or inhalation of vapor.
Fuel containers should be stored in a well ventilated area, away from sources of ignition, and the use of gasoline as a cleaning agent is strictly prohibited.
3. Electrical safety operation
Before starting, it must be properly grounded: if used as a backup power source to connect to household circuits, a certified electrician must install a transfer switch and set up a grounding rod (in accordance with the national electrical code NEC and local regulations); Use grounding extension cords and three core/double insulated electrical appliances.
Do not touch the live terminals or exposed wires of the running generator, and do not operate with wet hands or when the generator is damp; Do not use damaged or aged power cords, and the plug should be fully inserted into the socket (the 240V socket should be fixed by rotating 1/4 turn clockwise).
Do not use generators to supply power to medical support equipment to avoid loads exceeding the rated power of sockets or circuit breakers.
4. Safety check before operation
Confirm that all loads have been disconnected (unplug external appliances and extension cords).
Check the engine oil level (new engines need to be filled with oil first, starting without oil will damage the engine).
Check the fuel quantity, whether the fuel pipeline leaks, and whether the air filter is clean.
Remove tools, cloths, and other debris placed during maintenance to ensure there are no obstacles around.
Complete operation process (start run stop)
1. Preparation before startup
Site selection: Outdoor ventilation, flat and hard, dry, away from combustibles and ventilation openings.
Grounding: Connect the grounding terminal as required (operated by an electrician when a grounding rod is required).
Oil inspection:
Engine oil: After cooling down the machine for a few minutes, clean the area around the oil filling port, take out the dipstick and wipe it clean, completely unscrew it, and then take it out again. The oil level should be between the H (high) and L (low) marks. If it is insufficient, add 10W30 4-stroke engine oil (to avoid excess).
Fuel: Ensure that the fuel tank has sufficient qualified gasoline and check if the fuel valve is closed (before starting).
Load disconnection: Disconnect all external electrical appliances and extension cords, and confirm that the circuit breaker is in the reset state.
2. Manual startup steps (applicable to all three models)
Reset circuit breaker: Set the main circuit breaker and branch circuit breaker to the "ON" position (reset if tripped previously).
Open the fuel valve: Switch the fuel shut-off valve to "ON" (ensure that fuel flows to the engine).
Adjust the air door: Turn the air door handle to the "ON" position (necessary for cold engine start-up, can be omitted for hot engine).
Start switch: Push the engine control switch to the "RUN" position.
Pull the recoil starter: Slowly pull the recoil handle until you feel an increase in resistance (compression stroke), then quickly pull upwards and slightly away from the generator direction, repeating until the engine starts.
Stable engine: After starting the engine, wait for the speed to stabilize and gradually turn the throttle handle back to the "OFF" position (to avoid unstable operation caused by excessive mixture).
Connect the load: After confirming that the generator is running smoothly, connect the electrical appliances one by one (the total load does not exceed the rated power).
3. Precautions during operation
Real time observation of operating status: If there is abnormal noise, excessive vibration, smoking, sparks, or overheating of the socket, immediately stop the machine for inspection.
Avoid overload: It is forbidden to connect multiple high-power electrical appliances at the same time. If the circuit breaker trips, disconnect the load first, cool down, and then reset to investigate the cause of overload.
Fuel replenishment: When there is insufficient fuel during operation, it is necessary to first shut down for cooling, and then refuel according to the requirements of fuel safety operation.
Altitude adaptation: For every 300 meters (1000 feet) increase in altitude, the engine power decreases by about 3.5%, and the power decrease is even more significant when the carburetor is not modified. High altitude use requires early modification of the carburetor.
4. Shutdown steps
Normal shutdown
Disconnect the load: First unplug all external appliances and extension cords.
No load cooling: Run the generator without load for 3-5 minutes to reduce the temperature of the engine and generator.
Turn off the engine: Set the engine control switch to the "STOP" position; If stored for a long time, first close the fuel valve and let the engine run until the fuel runs out before automatically stopping (clearing the carburetor to prevent fuel deterioration).
Emergency shutdown
When encountering risks of fire, leakage, electric shock, or engine abnormalities, simply turn the engine control switch to the "STOP" position without the need for idle cooling.
Maintenance and upkeep (extend lifespan+ensure safety)
1. Maintain safety prerequisites
Stop the machine and cool it down until the surface is not hot to the touch, then remove the spark plug cap (to prevent accidental start-up); The electric starter model requires disconnecting the negative cable of the battery.
Maintain good ventilation in the area, keep away from sources of fire, avoid skin contact with engine oil and fuel, and wear gloves and goggles.
Do not use gasoline or flammable solvents to clean components. Waste engine oil and cleaning fluids must be disposed of properly in accordance with EPA or local regulations and cannot be dumped.
2. Long term storage and maintenance (not used for more than 30 days)
Cleaning the body: Clean dust, debris, and oil stains according to daily cleaning requirements.
Handling fuel:
Method 1: Drain the fuel tank, open the fuel valve, start the engine until the fuel runs out, and automatically stop (empty the carburetor).
Method 2: Add fuel stabilizer, fill the fuel tank (reduce air contact), run for 10 minutes to circulate stabilizer to the carburetor, and close the fuel valve.
Change engine oil: Follow the oil change steps to replace the new engine oil to avoid the old oil from deteriorating and corroding the engine.
Protect the cylinder: Remove the spark plug, inject 1 tablespoon of clean engine oil, pull the recoil handle several times by hand (to evenly apply the oil to the cylinder wall), and reinstall the spark plug.
Storage environment: dry, ventilated, cool, away from sources of fire and corrosive substances. WGen3600 needs to remove the wheels or cushion the body to avoid tire deformation under pressure.
Regular inspection: Pull the recoil handle several times a month (without starting) to keep the components moving.
Common troubleshooting (problem cause solution)
1. Engine running but no power output
Potential cause solutions
The main circuit breaker or branch circuit breaker trips and disconnects all loads. Press the circuit breaker reset button and check if the load exceeds the rated power to avoid overload
The power cord plug is not fully inserted into the socket and needs to be unplugged again. The 240V socket needs to be rotated clockwise by 1/4 turn to ensure locking
Replace the damaged or faulty power cord with a new qualified power cord (matching the load power)
External electrical malfunction: Disconnect the faulty electrical appliance and connect it to a known normal low-power appliance (such as a desk lamp) for testing
GFCI socket trip (some models) Press the "reset" button on the GFCI socket
Internal circuit failure of generator: Contact Westinghouse authorized service dealer for repair
2. The engine cannot start or immediately stalls after starting
Potential cause solutions
If the fuel tank is empty or the fuel has deteriorated, add qualified gasoline. If the deteriorated fuel needs to be drained and the fuel tank and carburetor need to be cleaned
The fuel valve is not open. Switch the fuel valve to the "ON" position
Improper adjustment of the air door (too tight or too loose): Set the air door to "ON" when starting the cold engine and to "OFF" when starting the hot engine. Adjust it slightly according to the operating status after starting
Air filter blockage. Clean or replace the air filter according to maintenance steps
Insufficient engine oil triggers low oil level shutdown to replenish oil to the qualified level, restart the engine
Spark plug malfunction (carbon buildup, improper clearance, damage) Clean, adjust clearance or replace spark plug
The spark plug cap is not locked tightly. Press the spark plug cap firmly to ensure that it fully covers the top of the spark plug
Spark eliminator blockage, remove and clean. Spark eliminator carbon buildup
Electric starter models have insufficient battery power. Charge or replace the battery
3. Sudden engine shutdown during operation
Potential cause solutions
After running out of fuel and shutting down for cooling, add gasoline
If the oil level is too low, replenish the oil to the qualified range and check for any oil leaks
Overloading caused overload tripping and partial load disconnection. After cooling down, reset the circuit breaker and restart
Clean the debris in the cooling system after the engine overheats, ensure good ventilation, stop and cool down before restarting
Check the fuel pipeline and filter for blockage, and clean impurities
4. Unstable engine speed (shaking, fluctuating fast and slow)
Potential cause solutions
The air door is not closed (not adjusted after the refrigeration machine is started), gradually move the air door to the "OFF" position
Clean or replace the dirty air filter
Poor fuel supply (blocked pipelines, dirty filters) Clean the fuel pipelines and filters
Frequent switching of loads to avoid frequent starting and stopping of high-power electrical appliances, maintaining load stability (slight fluctuations are normal phenomena)
Check for looseness of the governor linkage and tighten the governor linkage. If necessary, contact the dealer for adjustment
- YOKOGAWA
- Reliance
- ADVANCED
- SEW
- ProSoft
- WATLOW
- Kongsberg
- FANUC
- VSD
- DCS
- PLC
- man-machine
- Covid-19
- Energy and Gender
- Energy Access
- Renewable Integration
- Energy Subsidies
- Energy and Water
- Net zero emission
- Energy Security
- Critical Minerals
- A-B
- petroleum
- Mine scale
- Sewage treatment
- cement
- architecture
- Industrial information
- New energy
- Automobile market
- electricity
- Construction site
- HIMA
- ABB
- Rockwell
- Schneider Modicon
- Siemens
- xYCOM
- Yaskawa
- Woodward
- BOSCH Rexroth
- MOOG
- General Electric
- American NI
- Rolls-Royce
- CTI
- Honeywell
- EMERSON
- MAN
- GE
- TRICONEX
- Control Wave
- ALSTOM
- AMAT
- STUDER
- KONGSBERG
- MOTOROLA
- DANAHER MOTION
- Bentley
- Galil
- EATON
- MOLEX
- Triconex
- DEIF
- B&W
- ZYGO
- Aerotech
- DANFOSS
- KOLLMORGEN
- Beijer
- Endress+Hauser
- schneider
- Foxboro
- KB
- REXROTH
- YAMAHA
- Johnson
- Westinghouse
- WAGO
- TOSHIBA
- TEKTRONIX
- BENDER
- BMCM
- SMC
- HITACHI
- HIRSCHMANN
- XP POWER
- Baldor
- Meggitt
- SHINKAWA
- Other Brands
- UniOP
- KUKA
- IBA
- Beckhoff
- ADLINK
-
Siemens 6SL3244-0SA01-1AA0 - SINAMICS G120 Control Unit
-
DANFOSS 175Z2688 - COATEDE CONTROLUNIT VLT5000
-
SIEMENS 6FM1721-3AA20 - Positioning Module
-
REXORTH VTS0605 PVAR S21 - Drive Module
-
BECKHOFF 2915-0000 - Control Module
-
COOPER EATON CGLine 400 40071347901 - CEAG CG Controller
-
SIEMENS 3UF5031-3AN00-1 - SIMOCODE DP Basic Unit
-
SIGMATEK DNC305 05-011-305 - Drive Controller
-
Multivac MV1 10249768 - Control Module
-
SCHNEIDER ELECTRIC MES114 59646 & 59645 - Circuit Breaker Accessory
-
CAMILLE BAUER CAPAX 44-580-0012 - Transmitter
-
HENGSTLER VT360P LS1/TOK - Encoder
-
BURKERT 8792 - 24V DC IP65 / IP67 Positioner
-
SENSOPART V10-OB-A1-W6 - Vision Sensor
-
ALLEN-BRADLEY 1762-L40BXB SER.C REV.J - MicroLogix 1200 Controller
-
HITACHI CPU22-02HC 33025801-2 - CPU Module
-
HITACHI AGH-0 33034810-2 - Control Board
-
PHILIPS AIH110 VER 1.0 - Control Module
-
BAUMULLER DO8000 - Drive Controller
-
B&R PS477 3PS477.9 Rev.C0 - Power Supply
-
ABB ALFA LAVAL 200-CISB - Communication Interface 2 x SatBus
-
Moeller MI4-570-TA1 - HMI Operator Panel
-
ABB ACH550-01-06A9-4+B055 - Variable Frequency Drive
-
ABB TPU2 3HNE00313-1 REV 12 - Teach Pendant Unit
-
Schneider Electric BRS368H130ABA - Stepper Motor
-
Foxboro FCM100E P0972ZA - I/A Series Communication Module
-
Siemens 6ES7 450-1AP00-0AE0 6ES7450-1AP00-0AE0 - Simatic S7 Version:04 Counter Module
-
Schneider Electric ATV320U07N4W - Altivar Machine Drive
-
Priva TouchPoint Flush V06:02 5060002 - Control Panel
-
Lenze ESMD402L4TXA - 4kW SMD Inverter Drive
-
Lenze ESMD402L4TXA - 4kW SMD Inverter Drive
-
Schneider Electric PM210 PM210MG - Powerlogic Power Meter
-
ASCOM U982-DB/1C U982 - Power Supply / Communication Module
-
DYADIC SYSTEMS SCN5-010-050-S03-NA - Servo Cylinder
-
Reliance Electric GMI-S04 - AC/AC CONVERTER 380/400V 50/60Hz 3.9/5.2A
-
Pro-Face GLC150-BG41-XY32KF-24V 3080060 PFXGLC150BDBP - Touch Screen HMI
-
ROFIN RSL TERMINAL V2 0185.01/03 - TERMINAL
-
HONEYWELL R7241E1077 - Burner Control / Amplifier
-
SEW MM22C-503-00 8241201 - 2.2kW Movimot Drive
-
Brand Digital III 50mL - Burette
-
Danfoss 195N0039 VLT2811PS2B20STR1DBF00A00C0 - 2.4kVA VLT Drive
-
SONY LG10-2 EK1 - Digital Gauge Indicator
-
EMERSON SKD3400750 - 7.5kW AC Drive
-
SIEMENS 6AV6 542-0AG10-0AX0 - MULTIPANEL HMI
-
TELEMECANIQUE ATV21HU55N4 - ALTIVAR21 5.5KW Variable Speed Drive
-
MITSUBISHI A985GOT-TBA-EU - GOT900 Touch Screen HMI
-
SCHNEIDER LXM32AD30N4 - Lexium 32 Servo Drive
-
SICK PSR01-1501 M20Z-02550A122 - Safety Laser Scanner
-
GECMA CHALLENGER 15-2-FMO - LITE TOUCH Monitor
-
Uniop EK02 6ZA982 - HMI Operator Panel
-
TELEMECANIQUE ATV18U54M2 - SQUARE D ALTIVAR 18 3kW Drive
-
Schneider Electric ATV312HU75S6 - 7.5kW Altivar 312 Drive
-
Siemens 6GK7243-5DX30-0XE0 6GK7 243-5DX30-0XE0 - Communications Processor
-
Schneider Electric LV432455 VIGI630 - 3POLE Earth Leakage Module
-
Rexroth PSI 6100.750 L1 R911170694-107 - frequency inverter / inverter
-
SWEDISH MICROWAVE AB Ku-Band BDC 138010-45-D0 - Block Downconverter
-
METTLER TOLEDO IND429 IND429-BB30 - Weighing Terminal
-
Siemens 6SL3210-5HE10-4UF0 - Sinamics V90 Servo Drive
-
B&R X20CP0482 Rev.D0 - X20 CPU Module
-
Mitsubishi FR-E720S-110SC-EC FRE720S110SCEC - 31A~11A Drive With Filter
-
ABB ACH580-01-026A-4 - Variable Frequency Drive
-
Siemens 6SL3210-1KE13-2AP1 - SINAMIC G120CDP 1.1kw Drive
-
Schneider Electric TM250D 4P3D LV431440 - Compact NSX250 Circuit Breaker
-
RELIANCE ELECTRIC GD.722.81.00-A 802288-74C - MAXITRON Servo Control Card
-
Uniop EK02 6ZA982 - HMI Operator Panel
-
Siemens 6SE9113-7JA13 - MICRO MASTER Junior 1.5kW Inverter
-
Mitsubishi FR-E720S-110SC-EC FRE720S110SCEC - 31A~11A Drive with Filter
-
Johnson Controls FEC2621 MS-FEC2621-0 - Field Equipment Controller
-
BENDER IR475LYT-429 - A-ISOMETER Insulation Monitor
-
Berger lahr D550 RS15 22.550-00-30b - Stepper Drive
-
Rexroth PSI 6100.750 L1 R911170694-107 - Frequency Inverter / INVERTER
-
KOYO 205 D2-06B-1 D2-240 H2-ECOM D2-08ND3 F2-08TRS - DIRECT LOGIC PLC WITH MODULE
-
TELEMECANIQUE ATV18U54M2 ATV18U54M - SQUARE D ALTIVAR 18 3kW Drive
-
Lenze 471-E1.D - Board / Controller Speed
-
Mitsubishi FR-A740-00038-EC - Frequency Inverter
-
Johnson Controls IOM3723 MS-IOM3723-0 - Input/Output Module
-
CURTIS 1238-5602 - AC Motor Controller
-
FOXBORO P0912XX REV.A - 220VAC Power Supply
-
Siemens 6SE9113-7JA13 - MICRO MASTER Junior 1.5kW Inverter
-
Mitsubishi FR-A740-00038-EC - Frequency Inverter
-
KOYO 205 D2-06B-1 D2-240 H2-ECOM D2-08ND3 F2-08TRS - DIRECT LOGIC PLC WITH MODULE
-
AUTZ M406D-00101 - Servo Motor
-
Lauer PCS095 PG095.508.BB - Operator Panel
-
ABB SCOP45SB/DX232 - SattCon OP45 SB Operator Panel
-
SEW Eurodrive MCH42A0030-5A3-4-00 MDX60A0030-5A3-4-00 - 4.8kVA Movidrive Inverter
-
BENDER IR475LYT-429 - A-ISOMETER Insulation Monitor
-
Johnson Controls FEC2621 MS-FEC2621-0 - Field Equipment Controller
-
Johnson Controls IOM3723 MS-IOM3723-0 - Input/Output Module
-
Berger lahr D550 RS15 22550-00-30b - Stepper Drive
-
SIEMENS 6FX1120-4BD03 6FX11204BD03 5702049304.00 E-Stand: A - Sinumerik Module
-
Allen-Bradley 1771-NIV B - HIGH RESOLUTION ISOLATED ANALOG SERIES Module
-
HONEYWELL XFC2D06001 - Flow Computer / Controller
-
Contraves Varidyn Compact ADB 380.90M - DC Drive 380v - 400v 90A 50kVA
-
Red Lion Control GEM52000 - Control Module
-
Siemens 6ES5 955-3NC13 - modular power supply TYPE:DIN41752
-
Danfoss ICV50 G20Mn50T / 027H5200 - Valve zaw
-
Eberle PLS508 P-814 / 2X EA-88 / A-812 / MT-81 / S-11 - PLC with Modules
-
Siemens 6ES7 314-6CF01-0AB0 6ES7314-6CF01-0AB0 - SIMATIC CPU314C-2 DP
-
EBERLE EM-525-87 EM52487 - ICE DETECTOR BASE UNIT
-
Telemecanique / Schneider TSXRKZ02 - TSX Micro automation plus 7module
-
B&R 5DLSDL.1001-00 - Display Link Receiver
-
Siemens 6FX1120-4BD03 6FX11204BD03 5702049304.00 E-Stand: A - Sinumerik Module
-
ALLEN-BRADLEY 1771-NIV A - HIGH RESOLUTION ISOLATED ANALOG SERIES Module
-
ALLEN-BRADLEY 1771-NIV B - HIGH RESOLUTION ISOLATED ANALOG SERIES Module
-
Contraves Varidyn Compact ADB 380.90M - DC Drive 380V - 400V 90A 50kVA
-
Contraves Varidyn Compact ADB 380.90M - DC Drive 380V - 400V 90A 50kVA
-
Ropex RES-202 - Resistron Temperature Controller
-
HONEYWELL XFC2D06001 - Flow Computer / Controller
-
Telemechanics ATV452U40 - DIMMER ALTIVAR5 SERIES 452 4kW 5HP Frequency Inverter
-
VEGA VEGAPLUS61 PS61.XXAGPHAMAX - Radar Level Sensor
-
BRANSON ULTRASONIC TRANSDUCER - Ultrasonic Transducer
-
Danfoss ICV50 G20Mn50T / 027H5200 - Valve Valvola Zaw
-
Schneider Electric 2001549/1 GALAXY PW 5102851200 NT07 - panler card
-
REXROTH VT3006-36 A - Proportional Valve Amplifier
-
Allen-Bradley 1746-OBP16 SERIES:C - SLC 500 OUTPUT MODULE
-
SCHNEIDER LXM32MD12N4 - Lexium 32 Servo Drive
-
Schneider Electric ATV630U22N4 - 2.2KW Altivar Process Drive
-
Allen-Bradley 1746-OBP16 SERIES:C - SLC 500 OUTPUT MODULE
-
Vanderlande 0E2550-00002... - Bagtrax Integrated Power Module 400V 32A
-
B&R X20CP0410 Rev.D0 - X20 CPU Module
-
VANDERLANDE 0E2550-00002 02EDD2B0100 - BAGTRAX Integrated Power Module 400V 32A
-
Rexroth R061205010 - Linear Bushing / Bearing
-
INDRAMAT TVM1.2-50-220/300-W0-220/380 - Power Supply Module
-
Vanderlande 0E2550-00002... - Bagtrax Integrated Power Module 400V 32A
-
HOMAG KEB 07F5S1A-YA00 09E5T60-1001 - Combivert Inverter WITH KEYPAID AND FILTER
-
Siemens 3RW3047-1BB14 - Soft Starter
-
Sumitomo AF-500 AF502-A40 - 0.4kW Transistor Inverter
-
Sumitomo AF-500 AF502-A40 - 0.4kW Transistor Inverter

K-JIANG

Add: Jimei North Road, Jimei District, Xiamen, Fujian, China
Tell:+86-15305925923