

K-WANG


- Telephone:+86-15305925923
- contacts:Mr.Wang
- Email:wang@kongjiangauto.com
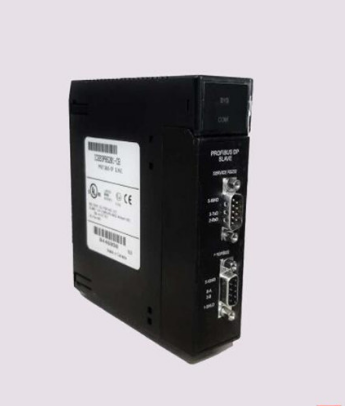
GE IC693PBS201 PLC Profibus DP network slave module
GE IC693PBS201 PLC Profibus DP network slave module
4、 GE Fanuc Profibus DP Network Product Description
The GE Fanuc series PACSystems supports Profibus DP master/slave modules 5136-PFB-VME for 90-70.
5136-PFB-VME, as a standard VME module, can be plugged into PAC70 systems and 90-70 PLCs
On the central rack and configured as "3rd PartyVME" by its programming software. This interface card uses 256K bytes
Standard memory and 1K byte short I/O storage area.
According to the working principle of Profibus DP, the DP master station should know the detailed information of all slave stations on the network
(e.g. station address and I/O quantity for each slave station). Utilizing the SST Profibus Configuration software package
These configuration information can be generated and saved as binary files (*. bss). This configuration information file can be accessed from
Download the serial port of 5136-PFB-VME to the module. This interface card can support up to 96 DP slave stations (such as stations)
If the number exceeds 32, a repeater is required.
4.1 The configuration steps for the 90-70 system using 5136-PFB-VME are as follows:
Establish a 90-70 Profibus DP network (Version 2.0)
4.1.1 Introduction
The 90-70 5136-PFB-VME interface program PB_0825 mentioned in this article can be completed in just 3ms (CPU915)
120 word slave data exchange. This program is a ladder diagram program that can be obtained through GEFanuc.
This article provides a detailed introduction on how to use the 5136-PFB-VME interface card to connect to the Profibus DP network in a 90-70 PLC.
The interface program PB_0825 mentioned in the article can support two 5136-PFB-VME interface cards. Of course, you can also
This interface program is used in PLC systems with only one interface card.
5136-PFB-VME, as a standard VME module, can be plugged into the central rack of 90-70 PLCs and can be used by 90-70
The programming software configuration is "3" PartyVME ". This interface card uses 256K bytes of standard memory and 1K bytes of short I/O
Storage area.
4.1.2 Hardware Installation
4.1.2.1 Setting Short I/O Address
The 5136-PFB-VME interface card occupies a short address interval of 1K bytes on the VME bus, and this memory interval can be occupied by 90-
Use the VME-Read/Write instruction (AM=29H) in CPU 70 to access. The starting address of this memory area is dialed
Set the 1st to 6th positions of code switch S1, and the switch settings in the following figure will connect the ground of two 5136-PFB-VME modules
The addresses are set to 8000H and 7000H respectively. Here, the interface card with address 8000H is referred to as the first card,
7000H is called the second card.
Short I/O Base Address
Base Address
position 1
Position 2
Position 3
position 4
position 5
position 6
8000H
OFF
ON
ON
ON
ON
ON
7000H
ON
OFF
OFF
OFF
ON
ON
The first card is set to 8000H, and the second card is set to 7000H
These two interface cards can be inserted into any slot on the mainframe, but there must be no empty slots between these two modules and the CPU.
GEFanuc Automation Network and Communication
Profibus DP network
The interface program consists of three basic subroutine blocks: Init_0, Init_1, and Assign. Init_0 is used to initialize the first block
Port card (with an I/O address of 8000H). Init_1 is used to initialize the interface card with an I/O address of 7000H. Assign subroutine
Used to exchange slave data between CPU and interface card.
Due to the internal use of the% L variable in the Init_0, Init_1, and Assign blocks, these three blocks must
Called in PB0 and PB1.
Note: After successfully initializing the first interface card with Init_0, the variable "Init_0_oK" (% T00217) will be set to
1. After successfully initializing the second interface card (with an I/O address of 7000H), the variable 'Init_1_SK'
(% T00233) will be set to 1. Variables% T00209 to% T00256 are reserved for initialization program use, user
Please do not use these variables in the program The variables% L00001 to% L01320 of subroutines PB-0 and PB_1 are assigned
When using program blocks, user programs should use variables with addresses of% L01320 or higher.
Steps:
4.1.3.1 Call the Init_0 and Init_1 subroutine blocks
Wg: Set whether the watchdog of the interface card is working. Fill in 1 to allow the watchdog to work, and fill in 0 to prohibit it from working.
Tx: The data sent from the master station to the slave station (i.e., the output of the slave station) is temporarily stored at the starting address in the% L variable. length
512 words. Its meaning is consistent with the BT parameters. Note that all output data from the slave station is in ascending order of the slave station address
The sequence is arranged in blocks, and the word length of each output data block from the slave station must be a multiple of 4 (for example, on the bus)
There are 4 slave stations with addresses 3, 4, 6, and 8 respectively. If the Tx parameter is% L01750, slave station 3 has 5 bytes
The output data from station 4 has 10 bytes and station 6 has 1 byte. Then the output data block from station 3
%Starting from L01750, the output data from station 4 starts from% L01754, and the output data from station 6 starts from
%Starting from L01762, the output data from station 8 starts from% L01766. Users can calculate each slave station themselves
The offset address of the output data in% L, and then use the MOV instruction to move the actual output data (% Q) to this address
Some% L. However, after the Assign program block is called for the first time, it will automatically calculate the output data of each slave station
%The offsets in L are stored in the TF parameters.
TF: The offset address of the output data block of each slave station calculated after the first call of the Assign program block. long
120 words. If TF=% L01501, calculated according to the above example, then after the first call of the Assign program block,
%L01501=1750,% L01502=1754,% L01503=1762,% L01504=1766. The user program should be in
After assigning the program, use indirect addressing to move the actual output data from the slave station to% L01750,% L01754
%L01762,% L01766. As shown below:
Mov
%O001
@L01501
RF: The offset address of each slave input data block calculated by the Assign program block, which has the same meaning as the TF parameter
Like. Length of 120 words.
Rx: The starting address of the data received by the master station from the slave station (i.e., the input from the slave station) is temporarily stored in the% L variable. long
The degree is 512 words, and its meaning is similar to the TX parameter.
St: Slave station status word, with a length of 120 words. Each status word represents the status of a slave station, with the first word representing the station's location
The status of the slave station with address 0, and the second status word represents the status of the slave station with address 1. The height of the status word
The byte stores the sequence number of the slave station (for example, if there are 4 slave stations on the bus with addresses 3, 4, 6, and 8, then this
The sequence numbers of the slave stations are 0, 1, 2, and 3, respectively. The low byte of the status word contains the current status information of the slave station
If it is 80H, it means that the slave station is working normally; If it is 00H, it means that the slave station has a fault, which may
It is a cable or connector malfunction or configuration error. If the entire status word is FFO0H, it means that the slave is not present
It is configured in the SST Profibus configuration software.
be careful:
If you only have one 5136-PFB-VME interface card in your system, you only need to use the program blocks PB-0 or PB_1
One of them.
| User name | Member Level | Quantity | Specification | Purchase Date |
|---|


- LTI Drives
- other
- ADLINK
- Beckhoff
- Shinkawa
- Other Brands
- AMAT
- Iba
- PEPPERL+FUCHS
- Aerotech
- WATLOW
- MAN
- ADVANCED
- Abaco
- YOKOGAWA
- KOLLMORGEN
- MEGGITT
- kong-sberg
- METSO
- Motorola
- NI
- OEMAX
- RELIANCE
- scanlab
- schneider
- uniop
- Vibro-Meter
- Honeywell
- Rolls-Royce
- MOOG
- GE
- B&R
- Woodward
- Yaskawa
- xYCOM
- Siemens
- Emerson
- HIMA
- Bently
- ZYGO
- FOXBORO
- OMACO
- PROSOFT
- ENTERASYS
- TRICONEX
- Parker
- Lenze
- KEBA
- Alstom
- CTI
- ABB
- A-B

-
 SIGMATEK TAE 1941 Touch Display Unit
 -
 SIGMATEK TAE 151 Touch Display Unit
 -
 SIGMATEK AKM series servo motor
 -
 SIGMATEK S-DIAS Control System
 -
 SIGMATEK Human Machine Interface (HMI)
 -
 SIGMATEK DIAS Drive 310-23 servo amplifier
 -
 SIGMATEK CCP 521 C-DIAS processor module
 -
 MEGMEET L6 series electric drive
 -
 Sysmex XN-1000/XN-2000 Hematology Analyzer
 -
 Sysmex XN-L series (XN-530/XN-430/XN-330) fully automatic blood cell analyzer
 -
 Sysmex XN-9000 Series Fully Automated Blood Analysis Pipeline
 -
 LTI‑Motion ServoOne Field Bus Systems PROFIBUS and PROFINET
 -
 Micro Innovation MICRO PANEL GF1 Color Touch Human Computer Interface
 -
 Micro Innovation WINbloc Distributed Remote I/O System
 -
 Micro Innovation MICRO PANEL GS-2 Industrial Touch Visualization Operation Panel (HMI)
 -
 LTi LST/LSH series synchronous servo motor
 -
 LTi CDE/CDB3000 positioning controller
 -
 ENOTEC SILOTEC ® Installation and Operation Instructions for 8000 Silo Monitoring O ₂/CO ₑ Analyzer System
 -
 ENOTEC ENSITU ® 7000 Compact Oxygen Transmitter Probe
 -
 ENOTEC COMTEC ® Installation and Operation Instructions for 6000 ATEX GasEx Explosion proof O ₂/COE Analyzer System
 -
 ENOTEC Integrated Products
 -
 ENOTEC OXITEC ® 500E Extraction Oxygen Analyzer
 -
 KUKA KR CS Box-2 Compact Controller for Four Axis SCARA Robot
 -
 KUKA KR C5 slim-2 Robot Controller
 -
 KUKA KR C5 micro With KUKA System Software (KSS/VSS) Assembly Instructions
 -
 KUKA KR C5 micro controller
 -
 KUKA KR C5 Controller Assembly Instructions
 -
 KUKA KR C5 compactcab and KR C5 small-size cab cabinets
 -
 KUKA KR C4 smallsize-2 small robot control cabinet
 -
 KUKA KR C4 Midsize/KR C4 Midsize CK Assembly Manual
 -
 ENOTEC ® Installation and Operation Instructions for 5000/5000+Oxygen Analyzer System
 -
 KUKA KR C4 extended; KR C4 extended CK Assembly Instructions Assembly Manual
 -
 Assembly/Installation Manual for KUKA KR C4 Compact Control Cabinet
 -
 KUKA Sunrise Cabinet Med Medical Collaborative Robot Special Control Cabinet
 -
 KUKA Sunrise Cabinet Next Generation Small Control Cabinet
 -
 KUKA KR C4 Smallsize-2 family's smallest control cabinet
 -
 KUKA KR C4 midsize; KR C4 midsize CK medium-sized control cabinet
 -
 KUKA KR C4 extended is a high-power multi axis control cabinet
 -
 General installation and operation instructions for KUKA KR C4 and KR C4 CK controllers
 -
 KUKA KR C4 compact controller operation instructions
 -
 Installation and Operation Instructions for KUKA Robot Arm
 -
 KUKA TITAN-2 Ultra Ground Overloading Six Axis Robot
 -
 Assembly instructions for KUKA KR SCARA-2 CS series robotic arm body
 -
 KUKA MA KR SCARA X Installation Guide
 -
 KUKA KR FORTEC-2 Ultra Heavy duty Ground Six Axis Robot Mechanical Assembly Manual
 -
 KUKA KR FORTEC-2 new generation heavy-duty ground six axis robot
 -
 KUKA Robots KR 1000 titan; KR 1000 L750 titan With F Variants Assembly Instructions
 -
 KUKA KR 600 FORTEC heavy-duty six axis ground mounted industrial robot
 -
 KUKA KR 500 MT FORTEC Heavy duty Six Axis Industrial Robot
 -
 KUKA KR 360 FORTEC Heavy duty Six Axis Industrial Robot
 -
 KUKA Sunrise Cabinet Med Medical Edition Robot Controller User Manual
 -
 KUKA Robots KR SCARA HO Assembly Instructions
 -
 KUKA Robots KR QUANTEC-2 PA Assembly Instructions
 -
 KUKA Robots KR QUANTEC-2 K and KR QUANTEC-2 P With K-F and P-C Variants Assembly Instructions
 -
 KUKA Robots KR QUANTEC-2 HO Assembly Instructions
 -
 KUKA Robots KR QUANTEC-2 HC Assembly Instructions
 -
 KUKA KR QUANTEC-2 series heavy-duty ground mounted six axis industrial robot
 -
 KUKA KR QUANTEC PA series heavy-duty palletizing robot
 -
 KUKA KR IONTEC-2 series six axis industrial robot
 -
 KUKA KR IONTEC ultra series six axis heavy-duty industrial robot
 -
 KUKA KR IONTEC HO Robot Assembly Manual
 -
 KUKA Robots KR CYBERTECH-3 HW Assembly Instructions
 -
 KUKA Robots KR CYBERTECH-3 Assembly Instructions
 -
 KUKA Robots KR CYBERTECH-2 arc Assembly Instructions
 -
 KUKA Robots KR CYBERTECH nano-2 Assembly Instructions
 -
 KUKA KR CYBERTECH CR HO (KR 20 R1810-HO) assembly instructions
 -
 KUKA Robots KR CYBERTECH With F variant Assembly Instructions
 -
 KUKA KR CYBERTECH CR (KR 20 R1810-CR) Clean Room (CR) Version 6-Axis Industrial Robot
 -
 KUKA KR AGILUS-3 ultra series small six axis serial robot
 -
 KUKA KR 300 R2700-2 C-F Cast Ceiling Mounted 6-Axis Heavy duty Industrial Robot
 -
 KUKA KR 20 R1820-2 E Six Axis Industrial Robot
 -
 Assembly instructions for KUKA KR AGILUS-3 small six axis robot
 -
 KUKA KR AGILUS-2 New Generation Small Six Axis Robot
 -
 KUKA KR 1000 1300 titan PA; KR 1000 L950 titan PA With F Variants Assembly Instructions
 -
 KUKA KR 700 PA/KR 700 PA Arctic Installation Guide
 -
 KUKA KR 18 R1450-3 PP six axis ground mounted industrial robot
 -
 KUKA 12 SCARA Series 4-axis SCARA Horizontal Joint Robot
 -
 KUKA KR 4 R600 Small Six Axis Industrial Robot
 -
 Installation Guide for KUKA KR 3 R540 Small 6-Axis Industrial Robot
 -
 KUKA LBR iiwa CR Clean 7-Axis Lightweight Collaborative Robot
 -
 KUKA KR AGILUS sixx series six axis industrial robot operation instructions
 -
 KUKA 4-axis heavy-duty SCARA horizontal multi joint robot KR 60 R1200 Z400 CS
 -
 KUKA KR 23 SCARA-2 CS SCARA Horizontal Multi Joint Robot
 -
 KUKA KR 20 SCARA CS Robot Assembly Instructions
 -
 KUKA KR 15 DELTA-2 Assembly Manual
 -
 KUKA KR 13 SCARA-2 CS Assembly Manual
 -
 KUKA KR 3 D1200 (Standard Delta Robot) Assembly Instructions
 -
 KUKA KR 3 D1200 HM Assembly Manual
 -
 KUKA LBR Med 7 R800, LBR Med 14 R820 Medical Edition Robot
 -
 KUKA Robots LBR iiwa 7 R800, LBR iiwa 14 R820 Operating instructions
 -
 KUKA LBR iiwa CR (Clean Room Version Robot) Operating Instructions
 -
 Lauer PCStopline series text operation panel
 -
 KUKA LBR iisy (MA_LBR_iisy V5) assembly manual
 -
 KUKA LBR iisy 3 R760 Assembly Manual
 -
 KUKA LBR iico Collaborative Robot Assembly Manual
 -
 Lauer LCAstarline (LCA300/LCA320/LCA325) Text Display Screen
 -
 Lauer PCS950/PCS950c/PCS950e operation console
 -
 Lauer EPC Series Industrial Embedded Human Computer Integrated PC User Guide
 -
 Bonfiglioli Precision Planetary Gearbox TIR-STD ENG R07
 -
 Bonfiglioli ACT/ACU Cold Plate Inverter Installation Instructions
 -
 Bonfiglioli EM-RES-02 Expansion Module
 -
 Bonfiglioli EM-RES-01 Expansion Module
 -
 Bonfiglioli EM-IO-04 Expansion Module
 -
 Bonfiglioli EM-IO-03 Expansion Module
 -
 Bonfiglioli EM-IO-02 Expansion Module
 -
 Bonfiglioli Vectron EM-IO-01 Expansion Module
 -
 Bonfiglioli F series gearbox
 -
 Installation, operation, maintenance, and spare parts of Bonfiglioli HF series reducers
 -
 Installation, Operation, and Maintenance of Bonfiglioli 300-300M Series ATEX Reducer
 -
 Bonfiglioli R3 series planetary gearbox
 -
 Bonfiglioli C series inline helical gear explosion-proof reducer
 -
 Bonfiglioli EM-ENC-05 Expansion Module
 -
 Bonfiglioli EM-ENC-04 Expansion Module
 -
 Bonfiglioli EM-ENC-03 Expansion Module
 -
 Bonfiglioli EM-ENC-02 Expansion Module
 -
 Bonfiglioli CM-CAN CANopen communication module
 -
 Bonfiglioli EM-SYS System Bus Expansion Module
 -
 Bonfiglioli CM-PDP Profibus DP Communication Module
 -
 Bonfiglioli CM-232/CM-485/CM-485T Modbus Communication Manual
 -
 Bonfiglioli BMS series precision planetary servo reduction motor
 -
 Bonfiglioli ACTION series ACT210 (230V), ACT410 (400V) frequency converter operation manual
 -
 Bonfiglioli ACT series frequency converter
 -
 Bonfiglioli HDP/HDO series gear unit IOM installation, operation and maintenance instructions
 -
 Installation, operation, and maintenance of Bonfiglioli 300-300M series reducers
 -
 Bonfiglioli 300M Modular planetary gearboxe
 -
 Bonfiglioli 3/H series heavy-duty modular gearbox
 -
 Bonfiglioli KRG-KCG-KSD hydraulic coupling
 -
 Bonfiglioli Vectron BTD-BCR servo motor

K-JIANG

Add: Jimei North Road, Jimei District, Xiamen, Fujian, China
Tell:+86-15305925923