

K-WANG
+086-15305925923
Service expert in industrial control field!


Product
Article
NameDescriptionContent
Adequate Inventory, Timely Service
pursuit of excellence


Ship control system
Equipment control system
Power monitoring system
Brand
Description
The main circuit breaker (MCB) is a major protection device of the drive. If a serious fault
occurs in the drive, the MCB must disconnect the main power supply to the drive
immediately. The main power supply must be disconnected without delay on an open or trip
command from the drive to prevent hazard to the personnel and further damage to the
equipment. The MCB is located on the primary side of the converter transformer
ABB ACS5000 water-cooled SYSTEM DRIVES
1.9. Items covered by delivery
The delivery includes the following items, whereas items 3 – 5 are shipped in a separate
container.
Figure 1–1 Typical delivery
1.9.1. Identifying the delivery
The drive and accessories are identified by the type code printed on the rating label.
The rating label is located on the back of the control compartment door.
The label provides information on the type of drive, the rated voltage, the frequency and the
current of the main and the auxiliary power supply.
1.10. Tools
ABB offers various tool sets containing all necessary tools and equipment for installation,
commissioning and maintenance of the drive. The content of the tool sets is described in
the manual Service equipment.
1) Drive (frame size 1 shown): shipped in
transport units.
Shipping splits are defined in the customer specific layout drawing.
2) Rating plate: on the first door from the left.
3) Roof joints
4) Roof attachments (only for marine drives)
5) Door keys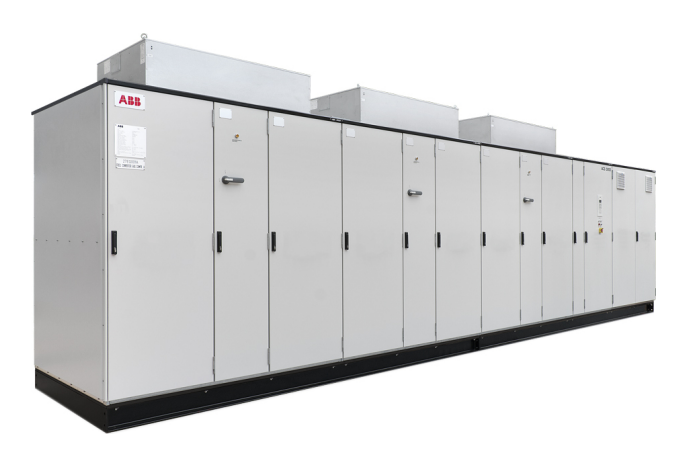
2.4. General safety instructions
1) Minimize hazards
2) Before energizing the drive:
• Remove all foreign objects are from the drive
• Fasten all internal and external covers securely
• Close, lock, and/or bolt all doors
• Move the release dial of the door safety switches into the locked position
3) Before working on the drive:
• Turn off, lock out, and tag out the main and auxiliary power supplies to the
drive
• De-energize the drive
• Ensure that the safety ground connections are in place
• Ensure that the appropriate personal protective equipment (PPE) is
available and used when required
• Inform the involved personnel about the potential safety hazards
• Wear hearing protection when a drive is running.
4) Before working simultaneously on the drive and on other drive
system equipment:
• Observe the relevant safety codes and standards
• Turn off all energy sources for the equipment
• Ensure that all lockout and tagout devices are in place
• Install barriers around and use appropriate covers on the equipment that is
still energized
• Inform the involved personnel about the potential safety hazards
5) In case of fire in the drive room:
• Observe the established rules and regulations for fire safety
• Only allow firefighters with the appropriate PPE to enter the drive room
2.5. The 7 steps that save lives
ABB’s 7 steps that save lives concept is a series of actions that must take place prior to
commencing work on or near electrical installations.
1) Prepare for the work: do an on-site risk assessment or job hazard analysis
that considers the limits of approach for shock and arc-flash.
• Be in possession of a clear work order to execute the work.
• When required, the access or work permit is to be obtained by a person who
is authorized for the specific electrical system.
• Engage the person responsible for electrical equipment or system to review
single-line diagrams, schematics, switching plans, etc.
• Ensure the competence of workers.
• Check for proper tools for the job.
• Determine and select the proper arc-rated Personal Protective Equipment
(PPE).
• Decide of the appropriate work methods and initiate the Permit To Work
(PTW) process.
2) Clearly identify the work location and equipment.
• Use your senses (sight, hearing and smell) to identify problem areas.
• Define the work area via barriers and barricading and label equipment.
• Avoid distractions such as talking or texting on the phone.
3) Disconnect all sources of supply and secure against reconnection by
applying Lockout/Tagout..
• If ABB is responsible for switching and it cannot be done remotely, then the
person performing the switching must be properly trained and wearing the
proper PPE identified in step 1.
• The Person in Charge of Work (PICW) must ensure that switching is
performed in the proper manner by witnessing it from a safe distance if
present on site or by engaging the person responsible for switching to
identify all isolation points.
• Apply Lockout/Tagout (LOTO) to the energy isolation device and if multiple
energy isolation devices are involved, then Group LOTO must be
implemented with the PICW serving as the Group LOTO Leader.
4) Verify the absence of operating voltage: always test before you touch!
Only use properly rated and inspected voltage detection devices and wear
proper PPE identified in step 1:
• Test voltage detection device
• Test for voltage
• Test voltage detection device
It is highly important that the voltage detection device is tested on a known
voltage source such as a Proving Unit or by performing an internal self-test,
according to the manufacturer’s instructions, before and after testing for the
absence of operating voltage.
5) Carry out earthing and short-circuiting.
• Close and lock the earthing switch if the electrical equipment is designed
for this purpose or apply portable equipment for earthing and short circuiting.
If this is carried out by the customer, then the PICW must ensure that this
equipment is properly earthed as a part of the integration/verification and
during step 7 when the PICW walks the PTW.
6) Protect against adjacent live parts and take special precautions when close
to bare conductors.
• Determine minimum approach distances, apply screening or shrouding,
and when applicable, padlock both cable and busbar shutters.
• If working within the restricted approach boundary or vicinity zone where
inadvertent movement could cause contact with live parts, special
precautions must be employed, such as the use of the properly rated
insulated gloves and tools.
7) Complete the permit to work and “Walk the Permit”.
• Check isolation points
• Verify that all circuits are isolated and secured
• Ensure all parties are integrated with the Lockout/Tagout
• Check the earths are properly applied
• Answer specific questions from the working group
• Ensure the work can proceed without danger
• Complete and verify the “Permit to Work
Residual risks must be considered by the drive system integrator and/or plant owner when
assessing the hazards of the equipment to personnel. The following risks can pose a hazard
to drive system personnel:
1) Electric power equipment generates electro-magnetic fields which can
cause a hazard to people with metal implants and / or a pacemaker.
2) Drive system components can move unintentionally when being
commissioned, operated, or serviced due to:
• Operation of the equipment outside the scope of the specifications
• Incorrectly assembled or installed equipment
• Wrongly connected cables
• External influence on, or damage of the equipment
• Wrong parameter settings
• Software errors
• Faulty hardware
3) Hazardous touch voltages can be present on drive system components,
which can be caused by:
• Operation of the equipment outside the scope of the specifications
• External influence on, or damage of the equipment
• Induced voltages by external equipment
• Condensation on equipment components, or pollution
• Faulty hardware
4) High temperatures, noise, particles, or gases can be emitted from drive
system components caused by:
• Operation of the equipment outside the scope of the specifications
• External influence on or damage of the equipment
• Incorrect parameter settings
• Software errors
• Faulty hardware
5) Hazardous substances can be emitted from drive system components due
to incorrect disposal of components
Purchase history
| User name | Member Level | Quantity | Specification | Purchase Date |
|---|
Total 0 Record
Related products
Customer Reviews
Satisfaction :
5 Stars
No evaluation information


- LTI Drives
- other
- ADLINK
- Beckhoff
- Shinkawa
- Other Brands
- AMAT
- Iba
- PEPPERL+FUCHS
- Aerotech
- WATLOW
- MAN
- ADVANCED
- Abaco
- YOKOGAWA
- KOLLMORGEN
- MEGGITT
- kong-sberg
- METSO
- Motorola
- NI
- OEMAX
- RELIANCE
- scanlab
- schneider
- uniop
- Vibro-Meter
- Honeywell
- Rolls-Royce
- MOOG
- GE
- B&R
- Woodward
- Yaskawa
- xYCOM
- Siemens
- Emerson
- HIMA
- Bently
- ZYGO
- FOXBORO
- OMACO
- PROSOFT
- ENTERASYS
- TRICONEX
- Parker
- Lenze
- KEBA
- Alstom
- CTI
- ABB
- A-B
172

-
 SUMITOMO T2100Z steel turning
 -
 SUMITOMO PSZ Turn Modular Quick Change Tool System
 -
 SUMITOMO EGU positive front corner chip breaker groove
 -
 SUMITOMO GND series slotting and cutting tools
 -
 SUMITOMO AC8000P series (AC8115P/AC8020P/AC8025P/AC8035P) steel turning
 -
 SUMITOMO AC6000M series (AC6020M/AC6030M/AC6135M/AC6145M) stainless steel turning
 -
 SUMITOMO ELECTRIC AC5000S series (AC5005S/AC5015S/AC5025S) heat-resistant alloy turning
 -
 SUMITOMO ELECTRIC AC4000K series (AC4010K/AC4015K/AC4125K) cast iron turning
 -
 SUMITOMO ELECTRIC AC1135U small lathe for turning small parts
 -
 SUMITOMO ELECTRIC AC1030U Material Blade
 -
 CCS 6900G/6900P Non Explosion proof Pressure Switch Installation and Maintenance Manual
 -
 BENDER WR70 × 175S (P)~WR200 × 500S (P) rectangular measuring current transformer
 -
 BENDER RCMA475LY B-type residual current monitor
 -
 BENDER IRDH575 A‑ISOMETER ® Insulation monitoring device
 -
 BENDER IRDH265 / IRDH365(ISOMETER ®) Insulation monitoring device
 -
 BENDER RCMA475LY AC/DC sensitive residual current monitor
 -
 Beckwith Electric M-3425A Generator Integrated Protection Relay
 -
 Automated Logic MEx816u I/O Expansion Module
 -
 ASEM HT2150 Fanless Industrial Panel X86
 -
 Advantest U3771/U3772 portable microwave millimeter wave spectrum analyzer
 -
 Advantest R6144 Programmable DC Voltage/Current Source (Calibration Source)
 -
 Aerotech UNIDEX 100/U100i single axis motion controller
 -
 Aerotech Ndrive MP Ultra Compact PWM Digital Servo Driver
 -
 Aerotech Ndrive HPe 10/20/30 High Performance PWM Digital Servo Drive
 -
 Aerotech Ndrive Linear (HLe/ML) Linear Servo Drive
 -
 Aerotech Ndrive CP Compact PWM Digital Servo Driver
 -
 Aerotech Ndrive Linear (HLe/CL/ML) linear servo drive
 -
 Aerotech Ndrive HL (EDU176 Rev1.08b) Digital Servo Drive
 -
 Aerotech Ndrive HP10/20/30 PWM Digital Servo Drive
 -
 Aerotech Ndrive series digital servo drives
 -
 SIGMATEK TAE 1941 Touch Display Unit
 -
 SIGMATEK TAE 151 Touch Display Unit
 -
 SIGMATEK AKM series servo motor
 -
 SIGMATEK S-DIAS Control System
 -
 SIGMATEK Human Machine Interface (HMI)
 -
 SIGMATEK DIAS Drive 310-23 servo amplifier
 -
 SIGMATEK CCP 521 C-DIAS processor module
 -
 MEGMEET L6 series electric drive
 -
 Sysmex XN-1000/XN-2000 Hematology Analyzer
 -
 Sysmex XN-L series (XN-530/XN-430/XN-330) fully automatic blood cell analyzer
 -
 Sysmex XN-9000 Series Fully Automated Blood Analysis Pipeline
 -
 LTI‑Motion ServoOne Field Bus Systems PROFIBUS and PROFINET
 -
 Micro Innovation MICRO PANEL GF1 Color Touch Human Computer Interface
 -
 Micro Innovation WINbloc Distributed Remote I/O System
 -
 Micro Innovation MICRO PANEL GS-2 Industrial Touch Visualization Operation Panel (HMI)
 -
 LTi LST/LSH series synchronous servo motor
 -
 LTi CDE/CDB3000 positioning controller
 -
 ENOTEC SILOTEC ® Installation and Operation Instructions for 8000 Silo Monitoring O ₂/CO ₑ Analyzer System
 -
 ENOTEC ENSITU ® 7000 Compact Oxygen Transmitter Probe
 -
 ENOTEC COMTEC ® Installation and Operation Instructions for 6000 ATEX GasEx Explosion proof O ₂/COE Analyzer System
 -
 ENOTEC Integrated Products
 -
 ENOTEC OXITEC ® 500E Extraction Oxygen Analyzer
 -
 KUKA KR CS Box-2 Compact Controller for Four Axis SCARA Robot
 -
 KUKA KR C5 slim-2 Robot Controller
 -
 KUKA KR C5 micro With KUKA System Software (KSS/VSS) Assembly Instructions
 -
 KUKA KR C5 micro controller
 -
 KUKA KR C5 Controller Assembly Instructions
 -
 KUKA KR C5 compactcab and KR C5 small-size cab cabinets
 -
 KUKA KR C4 smallsize-2 small robot control cabinet
 -
 KUKA KR C4 Midsize/KR C4 Midsize CK Assembly Manual
 -
 ENOTEC ® Installation and Operation Instructions for 5000/5000+Oxygen Analyzer System
 -
 KUKA KR C4 extended; KR C4 extended CK Assembly Instructions Assembly Manual
 -
 Assembly/Installation Manual for KUKA KR C4 Compact Control Cabinet
 -
 KUKA Sunrise Cabinet Med Medical Collaborative Robot Special Control Cabinet
 -
 KUKA Sunrise Cabinet Next Generation Small Control Cabinet
 -
 KUKA KR C4 Smallsize-2 family's smallest control cabinet
 -
 KUKA KR C4 midsize; KR C4 midsize CK medium-sized control cabinet
 -
 KUKA KR C4 extended is a high-power multi axis control cabinet
 -
 General installation and operation instructions for KUKA KR C4 and KR C4 CK controllers
 -
 KUKA KR C4 compact controller operation instructions
 -
 Installation and Operation Instructions for KUKA Robot Arm
 -
 KUKA TITAN-2 Ultra Ground Overloading Six Axis Robot
 -
 Assembly instructions for KUKA KR SCARA-2 CS series robotic arm body
 -
 KUKA MA KR SCARA X Installation Guide
 -
 KUKA KR FORTEC-2 Ultra Heavy duty Ground Six Axis Robot Mechanical Assembly Manual
 -
 KUKA KR FORTEC-2 new generation heavy-duty ground six axis robot
 -
 KUKA Robots KR 1000 titan; KR 1000 L750 titan With F Variants Assembly Instructions
 -
 KUKA KR 600 FORTEC heavy-duty six axis ground mounted industrial robot
 -
 KUKA KR 500 MT FORTEC Heavy duty Six Axis Industrial Robot
 -
 KUKA KR 360 FORTEC Heavy duty Six Axis Industrial Robot
 -
 KUKA Sunrise Cabinet Med Medical Edition Robot Controller User Manual
 -
 KUKA Robots KR SCARA HO Assembly Instructions
 -
 KUKA Robots KR QUANTEC-2 PA Assembly Instructions
 -
 KUKA Robots KR QUANTEC-2 K and KR QUANTEC-2 P With K-F and P-C Variants Assembly Instructions
 -
 KUKA Robots KR QUANTEC-2 HO Assembly Instructions
 -
 KUKA Robots KR QUANTEC-2 HC Assembly Instructions
 -
 KUKA KR QUANTEC-2 series heavy-duty ground mounted six axis industrial robot
 -
 KUKA KR QUANTEC PA series heavy-duty palletizing robot
 -
 KUKA KR IONTEC-2 series six axis industrial robot
 -
 KUKA KR IONTEC ultra series six axis heavy-duty industrial robot
 -
 KUKA KR IONTEC HO Robot Assembly Manual
 -
 KUKA Robots KR CYBERTECH-3 HW Assembly Instructions
 -
 KUKA Robots KR CYBERTECH-3 Assembly Instructions
 -
 KUKA Robots KR CYBERTECH-2 arc Assembly Instructions
 -
 KUKA Robots KR CYBERTECH nano-2 Assembly Instructions
 -
 KUKA KR CYBERTECH CR HO (KR 20 R1810-HO) assembly instructions
 -
 KUKA Robots KR CYBERTECH With F variant Assembly Instructions
 -
 KUKA KR CYBERTECH CR (KR 20 R1810-CR) Clean Room (CR) Version 6-Axis Industrial Robot
 -
 KUKA KR AGILUS-3 ultra series small six axis serial robot
 -
 KUKA KR 300 R2700-2 C-F Cast Ceiling Mounted 6-Axis Heavy duty Industrial Robot
 -
 KUKA KR 20 R1820-2 E Six Axis Industrial Robot
 -
 Assembly instructions for KUKA KR AGILUS-3 small six axis robot
 -
 KUKA KR AGILUS-2 New Generation Small Six Axis Robot
 -
 KUKA KR 1000 1300 titan PA; KR 1000 L950 titan PA With F Variants Assembly Instructions
 -
 KUKA KR 700 PA/KR 700 PA Arctic Installation Guide
 -
 KUKA KR 18 R1450-3 PP six axis ground mounted industrial robot
 -
 KUKA 12 SCARA Series 4-axis SCARA Horizontal Joint Robot
 -
 KUKA KR 4 R600 Small Six Axis Industrial Robot
 -
 Installation Guide for KUKA KR 3 R540 Small 6-Axis Industrial Robot
 -
 KUKA LBR iiwa CR Clean 7-Axis Lightweight Collaborative Robot
 -
 KUKA KR AGILUS sixx series six axis industrial robot operation instructions
 -
 KUKA 4-axis heavy-duty SCARA horizontal multi joint robot KR 60 R1200 Z400 CS
 -
 KUKA KR 23 SCARA-2 CS SCARA Horizontal Multi Joint Robot
 -
 KUKA KR 20 SCARA CS Robot Assembly Instructions
 -
 KUKA KR 15 DELTA-2 Assembly Manual
 -
 KUKA KR 13 SCARA-2 CS Assembly Manual
 -
 KUKA KR 3 D1200 (Standard Delta Robot) Assembly Instructions
 -
 KUKA KR 3 D1200 HM Assembly Manual
 -
 KUKA LBR Med 7 R800, LBR Med 14 R820 Medical Edition Robot
 -
 KUKA Robots LBR iiwa 7 R800, LBR iiwa 14 R820 Operating instructions
 -
 KUKA LBR iiwa CR (Clean Room Version Robot) Operating Instructions
 -
 Lauer PCStopline series text operation panel
 -
 KUKA LBR iisy (MA_LBR_iisy V5) assembly manual
 -
 KUKA LBR iisy 3 R760 Assembly Manual
 -
 KUKA LBR iico Collaborative Robot Assembly Manual
 -
 Lauer LCAstarline (LCA300/LCA320/LCA325) Text Display Screen
 -
 Lauer PCS950/PCS950c/PCS950e operation console
 -
 Lauer EPC Series Industrial Embedded Human Computer Integrated PC User Guide

K-JIANG

Add: Jimei North Road, Jimei District, Xiamen, Fujian, China
Tell:+86-15305925923