

K-WANG


- Telephone:+86-15305925923
- contacts:Mr.Wang
- Email:wang@kongjiangauto.com
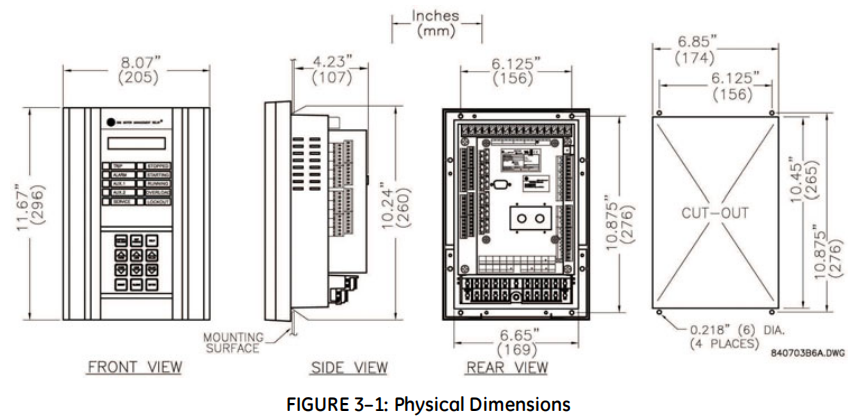
The 369 is contained in a compact plastic housing with the keypad, display, communication port, and indicators/targets on the front panel. The unit should be positioned so the display and keypad are accessible. To mount the relay, make cutout and drill mounting holes as shown below. Mounting hardware (bolts and washers) is provided with the relay. Although the relay is internally shielded to minimize noise pickup and interference, it should be mounted away from high current conductors or sources of strong magnetic fields
InstallationGE-369 Motor Management Relay
In this section, the terminals have been logically grouped together for explanatory purposes. A typical wiring diagram for the 369 is shown above in FIGURE 3–4: Typical Wiring for Motor Forward/Reversing Application on page 3–37 and the terminal arrangement has been detailed in FIGURE 3–3: TERMINAL LAYOUT on page 3–36. For further information on applications not covered here, refer to Chapter : Applications or contact the factory for further information. Hazard may result if the product is not used for intended purposes. This equipment can only be serviced by trained personnel. Do not run signal wires in the same conduit or bundle that carries power mains or high level voltage or currents. 3.3.3 Control Power VERIFY THAT THE CONTROL POWER SUPPLIED TO THE RELAY IS WITHIN THE RANGE COVERED BY THE ORDERED 369 RELAY’S CONTROL POWER. The 369 has a built-in switchmode supply. It can operate with either AC or DC voltage applied to it. The relay reboot time of the 369 is 2 seconds after the control power is applied. For applications where the control power for the 369 is available from the same AC source as that of the motor, it is recommended an uninterrupted power supply be used to power up the relay or, alternatively, use a separate DC source to power up. Extensive filtering and transient protection has been incorporated into the 369 to ensure reliable operation in harsh industrial environments. Transient energy is removed from the relay and conducted to ground via the ground terminal. This terminal must be connected to the cubicle ground bus using a 10 AWG wire or a ground braid. Do not daisy-chain grounds with other relays or devices. Each should have its own connection to the ground bus. The internal supply is protected via a 3.15 A slo-blo fuse that is accessible for replacement. If it must be replaced ensure that it is replaced with a fuse of equal size (see FUSE on page 2–13). 3.3.4 Phase Current (CT) Inputs The 369 requires one CT for each of the three motor phase currents to be input into the relay. There are no internal ground connections for the CT inputs. Refer to Chapter : Applications for information on two CT connections.
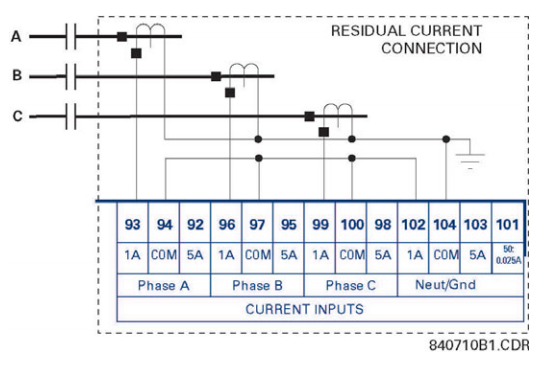
CHAPTER 3: INSTALLATION ELECTRICAL INSTALLATION 369 MOTOR MANAGEMENT RELAY– INSTRUCTION MANUAL 3–39 The phase CTs should be chosen such that the FLA of the motor being protected is no less than 50% of the rated CT primary. Ideally, to ensure maximum accuracy and resolution, the CTs should be chosen such that the FLA is 100% of CT primary or slightly less. The maximum CT primary is 5000 A. The 369 will measure 0.05 to 20 × CT primary rated current. The CTs chosen must be capable of driving the 369 burden (see specifications) during normal and fault conditions to ensure correct operation. See Section 7.4: CT Specification and Selection on page –230 for information on calculating total burden and CT rating. For the correct operation of many protective elements, the phase sequence and CT polarity is critical. Ensure that the convention illustrated in FIGURE 3–4: Typical Wiring for Motor Forward/Reversing Application on page 3–37 is followed. 3.3.5 Ground Current Inputs The 369 has an isolating transformer with separate 1 A, 5 A, and sensitive HGF (50:0.025) ground terminals. Only one ground terminal type can be used at a time. There are no internal ground connections on the ground current inputs. The maximum ground CT primary for the 1 A and 5 A taps is 5000 A. Alternatively the sensitive ground input, 50:0.025. can be used to detect ground current on high resistance grounded systems. The ground CT connection can either be a zero sequence (core balance) installation or a residual connection. Note that only 1 A and 5 A secondary CTs may be used for the residual connection. A typical residual connection is illustrated in below. The zero-sequence connection is shown in the typical wiring diagram. The zero-sequence connection is recommended. Unequal saturation of CTs, CT mismatch, size and location of motor, resistance of the power system, motor core saturation density, etc. may cause false readings in the residually connected ground fault circuit. FIGURE 3–5: Typical Residual Connection
The exact placement of a zero sequence CT to properly detect ground fault current is shown below. If the CT is placed over a shielded cable, capacitive coupling of phase current into the cable shield during motor starts may be detected as ground current unless the shield wire is also passed through the CT window. Twisted pair cabling on the zero sequence CT is recommended. FIGURE 3–6: Zero Sequence CT 3.3.7 Phase Voltage (VT/PT) Inputs The 369 has three channels for AC voltage inputs each with an internal isolating transformer. There are no internal fuses or ground connections on these inputs. The maximum VT ratio is 240:1. These inputs are only enabled when the metering option (M) is ordered. The 369 accepts either open delta or wye connected VTs (see the figure below). The voltage channels are connected wye internally, which means that the jumper shown on the delta connection between the phase B input and the VT neutral terminals must be installed. Polarity and phase sequence for the VTs is critical for correct power and rotation measurement and should be verified before starting the motor. As long as the polarity markings on the primary and secondary windings of the VT are aligned, there is no phase
| User name | Member Level | Quantity | Specification | Purchase Date |
|---|


- LTI Drives
- other
- ADLINK
- Beckhoff
- Shinkawa
- Other Brands
- AMAT
- Iba
- PEPPERL+FUCHS
- Aerotech
- WATLOW
- MAN
- ADVANCED
- Abaco
- YOKOGAWA
- KOLLMORGEN
- MEGGITT
- kong-sberg
- METSO
- Motorola
- NI
- OEMAX
- RELIANCE
- scanlab
- schneider
- uniop
- Vibro-Meter
- Honeywell
- Rolls-Royce
- MOOG
- GE
- B&R
- Woodward
- Yaskawa
- xYCOM
- Siemens
- Emerson
- HIMA
- Bently
- ZYGO
- FOXBORO
- OMACO
- PROSOFT
- ENTERASYS
- TRICONEX
- Parker
- Lenze
- KEBA
- Alstom
- CTI
- ABB
- A-B

-
 Foxboro E69F-BI2 on-site installation type electric pneumatic converter (I/P)
 -
 Foxboro DCS Compact200 series RH916RB (16 slot horizontal bottom plate)
 -
 Operation Instructions for Reliance Electric PSC7000 Control Card
 -
 Eaton MTL F809F Plus DTM Operating Instructions
 -
 Motorola ACE3600 series remote terminal unit RTU
 -
 MOOG D136-003-001 Rugged Motion Controller
 -
 Micro Innovation GF1 series industrial touch screen (Micro Panel)
 -
 Neles ™ NDX ™ Compact intelligent valve controller (positioner)
 -
 Jamesbury Valv‑Powr ™ Installation, maintenance, and operation of VPVL mod D actuator
 -
 Jamesbury Valv‑Powr ™ VPVL series D-type compact gear rack pneumatic actuator
 -
 GMW IPP 144-40G Embedded Thermal Printer
 -
 Meggitt C327845 flow cut-off valve
 -
 Meggitt C422425/C422685/C422695/C422705 solenoid valve
 -
 Selection of LTi Drives ServoOne Full Series Servo Drive Systems
 -
 Jenaer Antriebstechnik ECOVARIO ® Installation and Operation Instructions for 114/214/414 Servo Drivers
 -
 Honeywell TDC3000X APM Advanced Process Manager
 -
 Honeywell Notifier NFS2-3030 Intelligent Addressing Fire Alarm Controller
 -
 Honeywell EP-DOCX-SCA-SMSC-100 Universal Signal Conditioning Wiring Solution for Safety Systems (UMS)
 -
 Installation Instructions for Honeywell XL1404 Fire Alarm Controller
 -
 Honeywell Enhanced Micro TDC 3000 (MT11-520) DCS Control System
 -
 HIMA X-DI 64 01 Digital Input Module
 -
 Hirschmann MICE MS20/MS30 Industrial Switch Installation Instructions
 -
 Exor UniOP ePAD05/ePAD06 Compact HMI Industrial Human Machine Panel
 -
 Exor Effectiveness View eV058- TST/eV058- TNT Industrial Touch Screen HMI Human Machine Panel
 -
 Esd VME-PMC CADDY/2 Intelligent VME-PMC Carrier Board
 -
 Installation Instructions for Elmo Gold Tuba (G-TUB) Servo Drive
 -
 Eaton COM-MPB1-TP/COM-MPB2-TP communication module
 -
 Delta Tau Turbo PMAC2 PCI Ultralite Programmable Multi Axis Motion Controller
 -
 DATA PATTERNS DP-VME-5114 module
 -
 CMZ SVM Series Independent Two Phase Synchronous Servo Driver SVM1608 Product Specification
 -
 SUMITOMO T2100Z steel turning
 -
 SUMITOMO PSZ Turn Modular Quick Change Tool System
 -
 SUMITOMO EGU positive front corner chip breaker groove
 -
 SUMITOMO GND series slotting and cutting tools
 -
 SUMITOMO AC8000P series (AC8115P/AC8020P/AC8025P/AC8035P) steel turning
 -
 SUMITOMO AC6000M series (AC6020M/AC6030M/AC6135M/AC6145M) stainless steel turning
 -
 SUMITOMO ELECTRIC AC5000S series (AC5005S/AC5015S/AC5025S) heat-resistant alloy turning
 -
 SUMITOMO ELECTRIC AC4000K series (AC4010K/AC4015K/AC4125K) cast iron turning
 -
 SUMITOMO ELECTRIC AC1135U small lathe for turning small parts
 -
 SUMITOMO ELECTRIC AC1030U Material Blade
 -
 CCS 6900G/6900P Non Explosion proof Pressure Switch Installation and Maintenance Manual
 -
 BENDER WR70 × 175S (P)~WR200 × 500S (P) rectangular measuring current transformer
 -
 BENDER RCMA475LY B-type residual current monitor
 -
 BENDER IRDH575 A‑ISOMETER ® Insulation monitoring device
 -
 BENDER IRDH265 / IRDH365(ISOMETER ®) Insulation monitoring device
 -
 BENDER RCMA475LY AC/DC sensitive residual current monitor
 -
 Beckwith Electric M-3425A Generator Integrated Protection Relay
 -
 Automated Logic MEx816u I/O Expansion Module
 -
 ASEM HT2150 Fanless Industrial Panel X86
 -
 Advantest U3771/U3772 portable microwave millimeter wave spectrum analyzer
 -
 Advantest R6144 Programmable DC Voltage/Current Source (Calibration Source)
 -
 Aerotech UNIDEX 100/U100i single axis motion controller
 -
 Aerotech Ndrive MP Ultra Compact PWM Digital Servo Driver
 -
 Aerotech Ndrive HPe 10/20/30 High Performance PWM Digital Servo Drive
 -
 Aerotech Ndrive Linear (HLe/ML) Linear Servo Drive
 -
 Aerotech Ndrive CP Compact PWM Digital Servo Driver
 -
 Aerotech Ndrive Linear (HLe/CL/ML) linear servo drive
 -
 Aerotech Ndrive HL (EDU176 Rev1.08b) Digital Servo Drive
 -
 Aerotech Ndrive HP10/20/30 PWM Digital Servo Drive
 -
 Aerotech Ndrive series digital servo drives
 -
 SIGMATEK TAE 1941 Touch Display Unit
 -
 SIGMATEK TAE 151 Touch Display Unit
 -
 SIGMATEK AKM series servo motor
 -
 SIGMATEK S-DIAS Control System
 -
 SIGMATEK Human Machine Interface (HMI)
 -
 SIGMATEK DIAS Drive 310-23 servo amplifier
 -
 SIGMATEK CCP 521 C-DIAS processor module
 -
 MEGMEET L6 series electric drive
 -
 Sysmex XN-1000/XN-2000 Hematology Analyzer
 -
 Sysmex XN-L series (XN-530/XN-430/XN-330) fully automatic blood cell analyzer
 -
 Sysmex XN-9000 Series Fully Automated Blood Analysis Pipeline
 -
 LTI‑Motion ServoOne Field Bus Systems PROFIBUS and PROFINET
 -
 Micro Innovation MICRO PANEL GF1 Color Touch Human Computer Interface
 -
 Micro Innovation WINbloc Distributed Remote I/O System
 -
 Micro Innovation MICRO PANEL GS-2 Industrial Touch Visualization Operation Panel (HMI)
 -
 LTi LST/LSH series synchronous servo motor
 -
 LTi CDE/CDB3000 positioning controller
 -
 ENOTEC SILOTEC ® Installation and Operation Instructions for 8000 Silo Monitoring O ₂/CO ₑ Analyzer System
 -
 ENOTEC ENSITU ® 7000 Compact Oxygen Transmitter Probe
 -
 ENOTEC COMTEC ® Installation and Operation Instructions for 6000 ATEX GasEx Explosion proof O ₂/COE Analyzer System
 -
 ENOTEC Integrated Products
 -
 ENOTEC OXITEC ® 500E Extraction Oxygen Analyzer
 -
 KUKA KR CS Box-2 Compact Controller for Four Axis SCARA Robot
 -
 KUKA KR C5 slim-2 Robot Controller
 -
 KUKA KR C5 micro With KUKA System Software (KSS/VSS) Assembly Instructions
 -
 KUKA KR C5 micro controller
 -
 KUKA KR C5 Controller Assembly Instructions
 -
 KUKA KR C5 compactcab and KR C5 small-size cab cabinets
 -
 KUKA KR C4 smallsize-2 small robot control cabinet
 -
 KUKA KR C4 Midsize/KR C4 Midsize CK Assembly Manual
 -
 ENOTEC ® Installation and Operation Instructions for 5000/5000+Oxygen Analyzer System
 -
 KUKA KR C4 extended; KR C4 extended CK Assembly Instructions Assembly Manual
 -
 Assembly/Installation Manual for KUKA KR C4 Compact Control Cabinet
 -
 KUKA Sunrise Cabinet Med Medical Collaborative Robot Special Control Cabinet
 -
 KUKA Sunrise Cabinet Next Generation Small Control Cabinet
 -
 KUKA KR C4 Smallsize-2 family's smallest control cabinet
 -
 KUKA KR C4 midsize; KR C4 midsize CK medium-sized control cabinet
 -
 KUKA KR C4 extended is a high-power multi axis control cabinet
 -
 General installation and operation instructions for KUKA KR C4 and KR C4 CK controllers
 -
 KUKA KR C4 compact controller operation instructions
 -
 Installation and Operation Instructions for KUKA Robot Arm
 -
 KUKA TITAN-2 Ultra Ground Overloading Six Axis Robot
 -
 Assembly instructions for KUKA KR SCARA-2 CS series robotic arm body
 -
 KUKA MA KR SCARA X Installation Guide
 -
 KUKA KR FORTEC-2 Ultra Heavy duty Ground Six Axis Robot Mechanical Assembly Manual
 -
 KUKA KR FORTEC-2 new generation heavy-duty ground six axis robot
 -
 KUKA Robots KR 1000 titan; KR 1000 L750 titan With F Variants Assembly Instructions
 -
 KUKA KR 600 FORTEC heavy-duty six axis ground mounted industrial robot
 -
 KUKA KR 500 MT FORTEC Heavy duty Six Axis Industrial Robot
 -
 KUKA KR 360 FORTEC Heavy duty Six Axis Industrial Robot
 -
 KUKA Sunrise Cabinet Med Medical Edition Robot Controller User Manual
 -
 KUKA Robots KR SCARA HO Assembly Instructions
 -
 KUKA Robots KR QUANTEC-2 PA Assembly Instructions
 -
 KUKA Robots KR QUANTEC-2 K and KR QUANTEC-2 P With K-F and P-C Variants Assembly Instructions
 -
 KUKA Robots KR QUANTEC-2 HO Assembly Instructions
 -
 KUKA Robots KR QUANTEC-2 HC Assembly Instructions
 -
 KUKA KR QUANTEC-2 series heavy-duty ground mounted six axis industrial robot
 -
 KUKA KR QUANTEC PA series heavy-duty palletizing robot
 -
 KUKA KR IONTEC-2 series six axis industrial robot
 -
 KUKA KR IONTEC ultra series six axis heavy-duty industrial robot
 -
 KUKA KR IONTEC HO Robot Assembly Manual
 -
 KUKA Robots KR CYBERTECH-3 HW Assembly Instructions
 -
 KUKA Robots KR CYBERTECH-3 Assembly Instructions
 -
 KUKA Robots KR CYBERTECH-2 arc Assembly Instructions
 -
 KUKA Robots KR CYBERTECH nano-2 Assembly Instructions
 -
 KUKA KR CYBERTECH CR HO (KR 20 R1810-HO) assembly instructions
 -
 KUKA Robots KR CYBERTECH With F variant Assembly Instructions
 -
 KUKA KR CYBERTECH CR (KR 20 R1810-CR) Clean Room (CR) Version 6-Axis Industrial Robot

K-JIANG

Add: Jimei North Road, Jimei District, Xiamen, Fujian, China
Tell:+86-15305925923